Select the dimensions to be added and their properties in a dialog box.
- Dimension
- Select the dimensions to be added.
- Usually, you select the dimensioned objects for all dimensions to be added in the
floor plan drawing after clicking OK to leave the dialog box.
- In special cases you can select the dimensioned objects dimension-specifically by
using the Select button. Select the objects in the floor plan drawing. Confirm the
selection with the Confirm function to return to the Automatic Dimensioning dialog
box. You can select objects for all the other dimensions at the same time after you
have clicked OK to leave the dialog box.Dimensioning interior walls should be
mentioned as a special case. When you select the interior walls to be dimensioned
using the Select button, in addition to pointing the interior walls, also point the
exterior walls that determine the end points of the dimension line. After you select
the Confirm function, a dialog box opens in which you can select from the exterior
walls the lines of the wall structure layers to be dimensioned. You can select the
lines to be dimensioned from the following lines:
- Int. finish - Interior surface of the interior sheet
- Sub frame - Interior surface of the additional frame
- Interior - Interior surface of the frame
- Center - Frame center line
- Exterior - Exterior surface of the frame
- Sheathing - Exterior surface of the exterior sheet
- Siding - Exterior surface of the siding
Once you have selected the lines, you will return to the Automatic Dimensioning
dialog box, and you can proceed to select the automatic dimension properties.
- Dimension names
- When you select the check box, the name of the dimension is added at the beginning of
the dimension line.
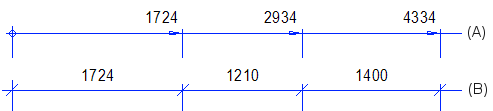
- Type
- The total dimension is always a dimension between two points. For the other dimensions,
you can select Base point (A) or Queue
(chain dimension) (B) as the dimension type. When you select both base point and queue
dimensioning as the type, the dimension is added as two dimension lines.
- Center window/door dimensions
- When you select the check box, the center of the opening is dimensioned, otherwise the
openings are dimensioned from the edges.
- Associative Dimensions
- Associative dimensions attached to dimension points are enabled by default. Associative
dimensions are attached to their targets: when you move the target, for example a wall,
the dimension follows the change if possible.
 Associative Dimensions Attached to
Dimension Points
Associative Dimensions Attached to
Dimension Points- Wall line
- Select the wall lines to be dimensioned. Please note, that if the dimension to be added
is smaller than the minimum dimension, the dimension is not added.
- Int. finish - Interior surface of the interior sheet
- Sub frame - Interior surface of the additional frame
- Interior - Interior surface of the frame
- Center - Frame center line
- Exterior - Exterior surface of the frame
- Sheathing - Exterior surface of the exterior sheet
- Siding - Exterior surface of the siding
- Minimum dimensions
- When selecting lines that are close to each other, minimum dimension may limit the
dimensions that will be added in the drawing. If the dimension to be added is smaller than
the minimum dimension, the dimension is not added. You can define minimum dimension
separately for the dimensioning types Queue (chain dimension) and
Base point. The default values of minimum dimensions are defined
in the BDSAUTODIM keyword group with the following keywords:
- min_dim_queue - Minimum dimension of queue dimension (chain dimension).
- min_dim_base - Minimum dimension of base point dimension.
- Layer
- Enter the layer on which the dimensions will be added. The default value displayed in
the field can be defined with the keyword auto_dim_layer in the BDSAUTODIM keyword group.
If the keyword is not defined, the default layer is 4.
- Save
- Save the properties you selected as follows:
- Type the name of the dimension group in the text field.
- Click the Save button.
- The dimension group is saved in the database. If you want to change the dimension group
properties later, activate the dimension group, edit the properties and save the dimension
group with the same name again.
- Activate
- Take a saved dimension group into use as follows:
- Select the name of the group from the list.
- Click the Activate button.
- Delete
- Delete a saved dimension group as follows:
- Select the name of the group from the list.
- Click the Delete button.
