
Point Cloud
You can use point clouds to outline a shape as a reference in 3D modeling. You can import a single point cloud per model. If you wish to import more than one point cloud, create an assembly.
Import a Point Cloud
- Create a new part.
 New Part to the Archive
 - Select the context-sensitive function
 Import Point Cloud.
File Formats
- Select a file. The file can be of following formats:
- .PTX (Leica)
- .E57
- .PTS
- .LAS, .LAZ
- .XYZ (ascii).
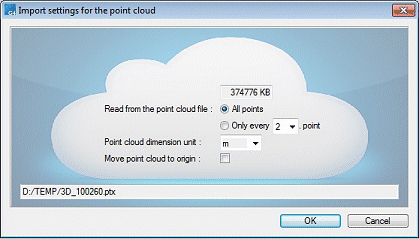
The Point cloud import settings dialog box opens.
- Select the following in the dialog box:
- Read from the point cloud file:
 All Points or Only Every N Point. For example, every other point, 2.
You can reduce the frequency of the point cloud by reading only part of the points.
- Select the point cloud unit.
- You can move the point cloud in such a way that the first point is positioned on the origin (0,0,0). Select In the dialog box
 Move Point Cloud to Origin.
- Read from the point cloud file:
- Click OK.
Note:
- Any intensity and RBG values or scanning point coordinates in the files will not be taken into account.
Edit / Hide / Delete
- Select in the part feature tree Point Cloud.
- Select the following contextual function:
- Delete
- Hide / Restore Hide a Selected Part in an Assembly
- Scale Scale a Part
- Point Size
- Color Pen Color
Note:
- In the sketch mode, you can set the point cloud to a point by using the X key.
- You can measure the distance of the points.
- To delete a point cloud in the working window, select the context-sensitive function Delete Point Cloud.