
New Document Dialog Box
Defines the type, name, saving location and item data for a new document.
The dialog box is opened with regard to the following archive functions.
- New Document to the Archive
- Adding a New Document to a File
- Saving as a New Document
- Modeling a New Part in an Assembly
- Create a New Part to the Archives
- Create a New Assembly to the Archives
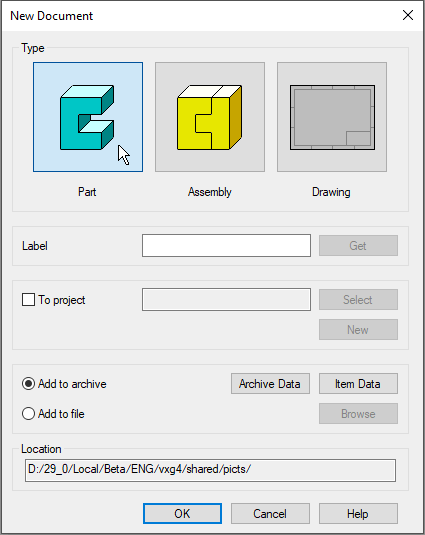
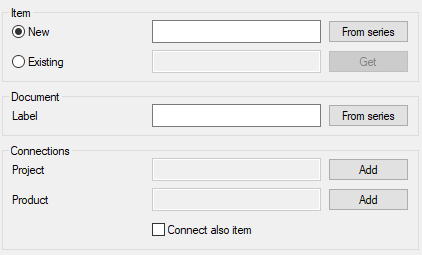
The bottom of the dialog box if Vertex G4 is connected to Vertex Flow.
Dialog Box Options
- Document type
- Defines the type of the new document.
- Select
 Part or
  Assembly or
 Drawing.
- The selected type is colored in blue (in the fiugre above, the part is selected).
- Select
- Label
- Defines the label of a document to be saved in the archives, and the label of a document to be added as a file.
- Name the document without an extension (vxp or vxm).
- Naming a Document
- Get button (next to the Label field)
- If the auxiliary programs def_mod_id and def_pic_id are used, the Get button is active.
- To Project
- If you wish to save the document in a project, select
 To project.
- The option
 Add to archive will then also be selected.
- The option
 Activate an Old Project Create a New Project
- If the document does not belong to any project, clear
 To project.
 - Select (project)
- Activate an old project with the button.
- The program opens a search window where you can enter search criteria for the project.
- OK performs a search and presents the projects that meet the search criteria.
- Select a project by double-clicking it, for example.
- New (project)
- Start a new project by selecting .
- The program asks for the project label. Enter the project label, and select OK.
- The program opens the dialog box Project Data.
- Enter the project archive data and select OK.
- Add to archive / Add to file
- As a general rule, use the Add to archive option
- In exceptional cases, use the option Add to file.
- In this case, the document cannot be found in the Vertex browser and you cannot add it to an assembly, for example.
- In exceptional cases, use the option
- Archives Data
- Enter the document archive data by selecting Archive Data.
- The button is not active if you are creating a new document as a file.
- The program opens the dialog box Archive Data.
- Enter the archive data. You can later complete the archive data.
- At least enter the designer’s id and the contents of the top description field.
- Archives Data of a Model
- Click OK to accept the archive data.
- Item Data button
- Enter the item data, if necessary
- The button is only active when you are adding a document to the archive.
- The program opens the dialog box Item Data.
- Enter the item data. You can later complete the item data.
- Browse (Add to file)
-
- The button is only active when you are adding a document as a file.
- Local
-
- The selection is only possible when you are modeling a new part in an assembly.
- Location
- Shows the document's directory path in the directory tree, in accordance with the data you specified for the document.
The bottom of the dialog box when Vertex G4 is connected to Vertex Flow..
- New Item
- Enter the document item.
- The product information management system Vertex flow is based on items and item structures, so as a rule, always use items.
- In most Flow systems, the item label is not entered for the documents in Flow, but is retrieved from the series. See the following section.
- By default, the document label gets its content from the item label, but you can change it.
- From series (New item)
- Retrieve the new label for the item from the series defined in Flow.
- By default, a few series are available, but different ways of serializing documents may have been customized for each customer.
- Existing - Get
- Click Get (next to the Existing field) when you know that the Flow already has an item for which you want to create a document.
- The program opens the dialog box Select Item.
- Fill in the search criteria.
- Select Get.
- Select an item from the list, for example by double-clicking the item
- The function completes the item selected as the label of the document (part, assembly or drawing).
- Label (Document)
- The field is completed according to the label of the item entered, selected from the series or searched for.
- Change the label, if necessary.
- We recommend that the document and item label are the same when the part or assembly only describes one item.
- From series (Document label)
- Select From series to retrieve the document label from the series defined in Flow.
- We recommend that the document and item label are the same when the part or assembly only describes one item.
- Connections: Project - Add
- Use the Add button to connect a document to a project defined in Flow.
- As a general rule, we recommend that only the so-called main item of the product is connected to the project and the parts and mid-level item structures are not connected to the project.
- Connections: Product - Add
- Use the Add button to connect a document to a product defined in Flow.
- As a general rule, we recommend that only the so-called main item of the product is connected to the product and the parts and mid-level item structures are not connected to the product.