
Edit a Truss Saved in the Library on a Work Plane
You can edit a truss saved in the library by opening a truss in a building model and editing the parts on a work plane. You can save the edited truss in the library with the same or a new name.
- First, add the truss to the building model.
- Select Modeling | Connection |
 Distance
 Activate
Workplane. Work planes in the building model are highlighted in color.
Activate
Workplane. Work planes in the building model are highlighted in color. - Select the truss volume you added the parts to.

- Select Confirm.
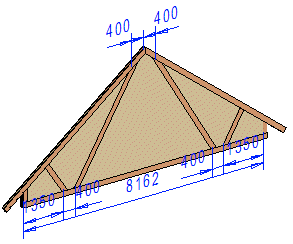
The dimension constraints added earlier to the work plane will be displayed.
- Rotate the model until the volume is perpendicular. For example, select
 Select From
Model from the tool strip, and select the truss volume.
Select From
Model from the tool strip, and select the truss volume. - Edit the truss on the work plane. You can add and delete profiles, joints and geometric constraints in the same way as when modeling a truss.
- After finishing the truss, close the work plane. Select Modeling |
Connection | Distance
 Close
Workplane.
Close
Workplane. - Select the truss volume in which you edited the truss.
- Do either of the following:
- Select Truss | Parts |
 Generate
Parts.
Generate
Parts. - Right-click to open the context-sensitive menu, and select
 Generate
Parts.
Generate
Parts.
- Select Truss | Parts |
- Select a customer-specific library from the Libraries list.
- Click Save to library. The Truss library dialog box opens.
- Define the library data of the truss in the dialog box. Name the truss.
If a truss exists with the same name, you will be prompted: Replace it? Select either of
the following:
- Yes - The edited truss will replace the old truss with the same name.
- No - You can rename the truss in the Truss Library dialog box.
- Confirm by clicking OK.
