
Position a Library Feature
General
- When you add a library feature, it is attached to the cursor from its grip point.
- If no grip point has been added to the library feature, the origin of the feature is attached to the cursor.
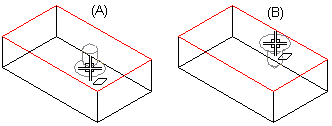
- You can add a library feature adding material (Boss, A) or cutting material (Cutout, B).
- The direction of the feature will be changed automatically depending on whether it will be used for adding or cutting out material.
- Once you have assigned a location to the feature from the geometry, the program switches to sketching mode and you can position the feature by dragging it to a new location or using geometric constraints to an exact location.
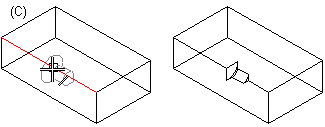
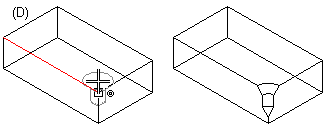
The grip point of the library feature will snap to a face, a line, or a point
- Face (see image above) - The direction of the library feature on the face will be determined by whether it will be used for adding or cutting out material.
- In the direction of line (C) - When you move the library feature to a line, the cursor will snap to the line and the feature will be set in the direction of the line.
- Point in the direction of face (D) - When you move the library feature near a point in the direction of the face, the cursor will snap to the point and the feature will be set in the direction of the face.
Position the feature
- If necessary, drag the feature close to the correct location. Note that the plane of the feature locating surface does not change, even if you drag the feature outside the surface or onto another surface.
 Note that if you later modify the sketch of the feature, you can no longer use the drag, but you must define the location using geometric constraints.
- Note that the perpendicularity of the feature added to the cylindrical surface to the surface is not preserved when dragging, but the feature retains its original orientation.
- If necessary, use the Relocate function for the sketch.
- Then use geometric constraints to position the feature.