Select the joint properties in the Passing Joint dialog box.
Dialog Box Options
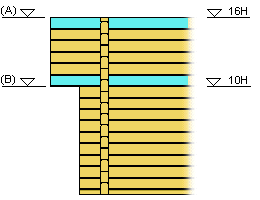
- Log joint height
- You can add the joint to only a part of the corner height by defining the upper (A) and
lower (B) limits of the joint in relation to the floor base height.

- Define the lower and upper limit by clicking in the model:
- Click the Select button next to the Top field.
- Select a log in the model. The top height is the height of the selected log's top
surface.
- Click the Select button next to the Bottom Side field.
- Select a log in the model. The bottom height is the height of the selected log's
bottom surface.
- You can also type the height position in log tiers in the text fields, for example 10h
or 10H.
- If you want to add the joint to the entire corner, leave the fields empty.
- Machining parameters
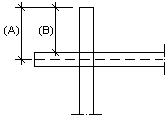
- Enter the corner overlap in the Passing Length field. Choose one
of the following as the corner's measurement method:
- Center line - The corner overlap is measured from the wall's center line (A)
- Outer line - The corner overlap is measured from the wall surface (B).

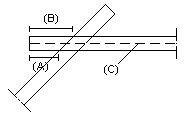
- Select the edge that determines the corner overlap in an oblique corner. Select one of
the following:
- Shorter edge
- Center line
- Longer edge


