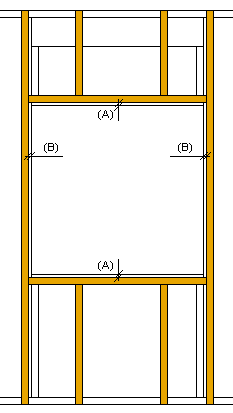
Tool for a wall panel's sub frame layer (FRAME, FRAMING). Select Tool from the list. If necessary, edit the tool parameters in the dialog box. The parameters define the cross sections, spacing, and other necessary values of the parts.
The thickness of a layer changes according to the selected cross section. The thickness only changes in the structure model, not in the architectural model.
Frame: Tracks and Studs
- Spacing
- Select the part spacing from the list or type the desired value in the text field.
- If you select the Parts option for aligning on the Direction and Alignment tab, the parts will be positioned at the locations of the main frame parts according to the spacing of the main frame.
- Cross sections
- Select the cross sections for the sub frame parts. If a cross section field is empty, a part will not be added.
- Piece - Sub frame stud.
- Side Piece - Side stud
- Header Piece - Bottom and top plate
- Change the piece with the Sel button. Select the profile library and cross section in the Piece Properties dialog box.
- Piece Properties
- Opening Offsets
- Defines the distance of the pieces to be placed at the edges of the opening from the edges of the opening. Enter the values in the Top/Bottom (A) and Left/Right (B) fields.

- Insulation
- Select this checkbox, when you want to add insulation to a sub frame layer. Select the insulation from the insulation library with the Select button. The default thickness of insulation is the thickness of the layer.
- If the frame consists of I-beam structures, select whether to add the insulation to the profile web or not:
- No - The insulation will be added according to the profile's rectangular cross section.
- Yes - The insulation will be added according to the I-beam cross section.
Frame: Gen
- Mount
- The mounting method selected in the framing tool is set for all parts created with the tool.
- Select one of the following from the list:
- Loose Part - A part to be mounted at the building site.
- Mount Manually - A part to be manually placed and mounted in the factory.
- Manually Placed - A part to be manually placed but automatically mounted in the factory. You can use this mounting method for parts that the production line cannot automatically position due to the size or shape of the part, but over which the nailing and glue lines must continue.
- You can also choose the mounting method for an individual part, see Define an Exceptional Mounting Method for a Part.
Direction and Alignment
- Flip
- Defines the rotation angle by which the direction of the sub frame will be rotated in relation to the main frame layer. Select 0, 90, 180 or 270 from the list.
- Align
- Defines how the parts are to be spaced. Select from the list:
- Left - When Rotate = 0 (vertical sub frame), the spacing is started at the left edge of the panel, viewed from the inside. When Rotate = 90 (horizontal sub frame), the spacing is started at the bottom edge.
- Right - When Rotate = 0 (vertical sub frame), the spacing is started at the right edge of the panel, viewed from the inside. When Rotate = 90 (horizontal sub frame), the spacing is started at the top edge.
- Middle - The spacing is started at the middle, to both directions.
- Parts - The parts will be positioned at the locations of the main frame parts (Rotate = 0 or 180).
- Even - The parts are spaced evenly so that the distance between their centers is at most the value entered in the Spacing field.
- Offset
- Defines an additional offset, when you select the Left or Right option for aligning. A positive value moves towards the frame area, a negative value away from the area.

