
Add a Profile to a Structure
Architectural, Framer
You can add a profile to a wall panel or to another plane structure (floor or roof panel, framing) so that the profile is automatically connected to the structure.
- Select a panel and a layer or a framing using a part, for example.
- Do either of the following:
- Select Panel | Framing |
 Add Profile
 Add Profile.
 - Select Plane Structure | Framing | Add Profile Add Profile.
- Select the profile properties.
- If necessary, change the direction of the cross section with the functions in the
auxiliary menu.
 Match Cross Section Direction to
Plane Normal
Match Cross Section Direction to
Plane Normal Match Cross Section Direction to
Another Profile
Match Cross Section Direction to
Another Profile Select Cross Section
Direction
Select Cross Section
Direction
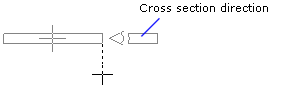
When you add a profile in the 2D drawing, the cursor shows the direction of the cross section.
- Select the locating point at the start of the profile in one of the following ways:
- Select one of the nine points on a rectangle drawn around the cross section as the
locating point from the auxiliary menu.

- Select the
 Select Locating Point
function from the auxiliary menu, and select any point on the cross section as the
locating point. If required, you can change the locating point to one of the nine
quick-selection points, and then activate the selected locating point again by selecting
the
Select Locating Point
function from the auxiliary menu, and select any point on the cross section as the
locating point. If required, you can change the locating point to one of the nine
quick-selection points, and then activate the selected locating point again by selecting
the  Free Locating Point
function.
Free Locating Point
function.
- Select one of the nine points on a rectangle drawn around the cross section as the
locating point from the auxiliary menu.
- Select the start point of the profile.
- If necessary, select the locating point for the end of the profile. The locating point can
be a different point at the start of the profile and at the end. Open the locating point
menu for the end of the profile by using the function
 Common/Separate Locating Point for
Start And End Points.
Common/Separate Locating Point for
Start And End Points. - Select the end point of the profile.

Note:
- You can change the direction of the cross section also by using the cursor keys:
- Left - Counter-clockwise at intervals of 90°.
- Right - Clockwise at intervals of 90°.
The direction of rotation is determined by viewing the cross section from the end point of the profile towards its start point.
- When adding a profile, you can change its locating point, direction or properties at any time.