
Add a Grid
Architectural
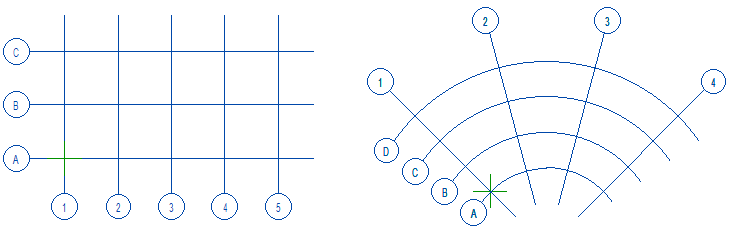
Add a rectangular or polar grid.
- Select Modeling | Zone |
 Grid. The Module Grid Properties dialog box opens.
 - Select a rectangular or polar grid, and select the grid properties in the dialog box.
- You can select the property Prevent delete for a grid. This prevents accidental deletion of the grid. To delete a grid, first open the grid properties and clear the Prevent delete option.
- You can preview the grid by clicking Apply.
- Confirm adding or editing the grid by clicking OK.
By default, the grid is added to the origin point of the model. To click the location of the grid, do the following:
- First, select the grid properties in the dialog box.
- Select the Location tab and select Click.
- Select the location and direction:
- The location of the lower left corner of a rectangular grid and the direction of the horizontal grid lines.
- The intersection point of the first radial grid line and the first grid line parallel to the arc, and the direction of the first radial grid line.
- You can preview the grid by clicking Apply.
- Confirm adding or editing the grid by clicking OK.
Note: When you open the grid properties for editing, the option Edit all parameters is displayed at the bottom of the dialog box:
- By default, the option is empty, allowing you to edit only the label direction (vertical, horizontal, or global horizontal) and the location on the grid line (start, end, or both). If you have made modifications to the grid using the line grip point functions, such as moving the end of the grid line, moving the grid line label, or editing the label, these changes will remain unchanged.
- If you want to edit all properties, select Edit all parameters. In this case, the grid is regenerated and you will lose any changes made to the grid line ends and labels with the grip point functions.