
Automatic Beam Pockets
Framer
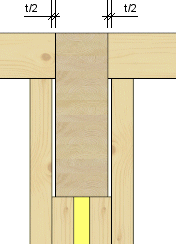
Add a beam pocket according to the beam’s cross section and height to a wall panel. By default, two cripple studs and two side studs with the same cross section as the frame stud will be added to the beam pocket. The sheathing will be cut at the location of beam pocket. Once you have added an automatic beam pocket, you can open its properties for editing and change the stud size, number of studs and other properties.
- Select Modeling | Panel |
 Wall
Wall 
 Wall Panel Layout Accessories.
 - Select Automatic Beam Pockets in the browser.
- Enter the beam pocket’s tolerance (t) in the text box.
- Select the walls. Hold down the Ctrl key.
- Select Confirm.
- Select the beams. Hold down the Ctrl key.
- Select Confirm.
- Quit by pressing the Esc key.
 Note
Note
- You can relocate the panel macro by dragging the grip point before generating the panel breaks.
- If you do not wish to use a beam pocket, the studs located at beams can also be notched by determining a joint between the wall and the beam using the Joint Between Beam And Wall Frame function.