Change Pipe/Duct Size
Piping Design
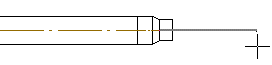
When adding a pipe or duct line, you can change the size of the pipe/duct by first adding a narrowing volume of the desired size from the component library. From the component, the line is continued automatically at the correct size.
- Once you have selected the previous point for the line, select either of the following:
- Piping | Component |
 Add
Add - Piping | Component |
 Add
Add
The browser is opened.
- Piping | Component |
- Select a component, for example:

- Select the correct size and other component properties.
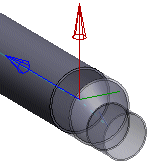
- If necessary, rotate the component locked on a pipe/duct before selecting its position.
 Rotate to the Left or Right by a Single
Rotation StepEnter the Rotation Angle around the Z AxisIndicate the Rotation Angle around the Z Axis
in a Model
Rotate to the Left or Right by a Single
Rotation StepEnter the Rotation Angle around the Z AxisIndicate the Rotation Angle around the Z Axis
in a ModelIf necessary, rotate the component in the model Activate the model window by pressing the F2 key. Return to the drawing window by pressing the F2 key again.
- When the desired component is in the correct position, select the
Confirm function.
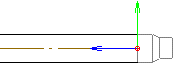
- Continue adding the line. The pipe/duct information is determined according to the added
component.