
Component Properties Dialog Box - Select a Floor or Ceiling
You can select the properties of a floor or ceiling being added or edited in the Component Properties dialog box. The title bar of the dialog box displays the name of the selected structure. You can accept the default floor or ceiling properties or select the desired layers for the structure, and their properties. The structure added last is the default.
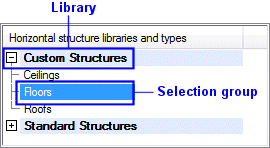
- Structure libraries and types
- You may have several libraries available. The structures are grouped by selection groups in the libraries. Select a library and selection group from the list at the top left corner of the dialog box. You can search for a library by activating the list box and pressing Ctrl+F. Enter the desired character string in the text field. If you wish to collapse or expand all libraries, right-click to open the context-sensitive menu and select Expand all or Collapse all.
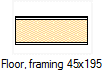
- Floor or ceiling
- Select the thumbnail image of a floor or ceiling in the bottom left corner of the dialog box. You can search for a floor or ceiling by activating the list box and pressing Ctrl+F. Enter the desired character string in the text field.
- Subtype of a floor or roof
- You can select a subtype for a floor or roof. There is no subtype selection for a ceiling. The subtype can be used for example:
- In material reports to sum up the quantity data for a certain type of structure.
- In the IFC model submitted as an attachment to a building permit to indicate what type of structure it is.
Subtypes are written to the components.xml file, which is used as the source file for Excel reports.
Select the subtype from the list above the Layers table in the middle of the dialog box.
Floor subtype components.xml SUB_TYPE Base floor S_BASEFLOOR Intermediate floor S_INTERMEDIATE_FLOOR Balcony S_BALCONY Landing S_LANDING Mezzanine S_MEZZANINE Exterior level S_EXTLEVELFLOOR Subtype of roof components.xml SUB_TYPE Shelter S_SHELTER Balcony S_BALCONY If a subtype is not selected, the SUB_TYPE of the structure in the components.xml file is UNDEFINED.
- Parameters of a floor or ceiling
- Floor or ceiling parameters are available for selection when you have made a thumbnail image active by clicking, and no layer is selected in the Layers table or the preview image. If necessary, deselect a layer by clicking an empty space in the Layers table.
- Layers
- The default properties of the layers have been defined in the library. If necessary, you can select the type, material and thickness for each layer. You can add and delete layers.
- Layer Parameters
- Layer parameters are available for selection, when you have selected a layer in the Layers table or in the preview image.
- Pick
- You can select a floor or ceiling in the building by clicking the Pick button. Click a floor or ceiling in the drawing or in the model. The dialog box will not reopen; you can directly continue using the adding or editing function.
- Show All
- The Structure Libraries And Types list shows the structures according to the selected adding function. When you select to add a floor, the list shows all the floor type structures, other types are hidden. When you select to add a ceiling, the list shows all the ceiling type structures, other types are hidden. You can view all the structures in the floor and ceiling libraries regardless of their type by clicking Show all.
- Default Floor
- A default structure has been defined for each main height level in the building's height level data. When you are adding a floor, you can select this default structure by clicking Default floor.
- Preview
- The model and cross-section of the structure is displayed in the preview windows.
Note:
- When you exit the dialog box by clicking the OK button, the selected properties are made default values.
- You can edit the floor or ceiling properties during the clicking of points by selecting the function Select Material from List. Select the function from an auxiliary menu.