Add dimension tolerance
You can add the dimension tolerance when dimensioning, or later by selecting the dimension to edit. Define the dimension tolerance properties, the tolerance symbol or deviations in the dialog box.

- Add 2D drawing.
- Select the dimensioning function.
- Select dimension auxiliary function Edit dimension after adding by
clicking the button.

- Point elements to be dimensioned.
- Click the position of the dimension figure.
- Select the dialog box page Text.
- Enter the tolerance either in the Text editing window, or in the Tolerance field.
- Select OK.
Example: Add dimension tolerance
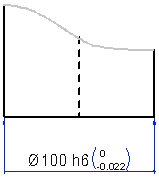
Add to the diameter dimension the dimension tolerance.
For example, as a Tolerance symbol
- First, add to the projection diameter dimension using the dimensioning function. Then
select the diameter dimension, and the
 Properties. Edit the symbol properties in the dialog box.
 - Type in the Tolerance field the character string: h6. Confirm the markings data, and the tolerance symbol is displayed in the dimension figure.
For example, as the Deviation.
- Determine the dimension tolerance using deviations. Type in the Tolerance field the character string: +0.3 +0.1. Confirm the properties to display the deviation in the dimension figure.
