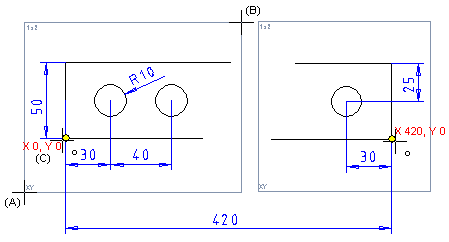
Projection Detail
Create from the drawn drawing's elements the projection detail.
- In the principle of the projection detail is, that the projection is drawn partially, and which is formed, two or several projection areas, for example.
- A reference point is selected from the projection area, making it possible to use dimensioning between the projections. The borders of the projection area are not displayed in printouts.

- On the
 tab, in the Tools group, select Projection, and select
  Projection Detail.
 - Define the projection detail data
 Projection Detail Data dialog box.
 - Click the lower-left corner point (A).
- Click the upper-left corner point of the detail projection (B).
- Select the position of the reference point in the projection area (C).
- Click the distance of the areas.
- Select Confirm.
Note:
- The creation of a projection detail can also begin with a whole, finished projection that is cut, for example, into two or more projection areas.
- Set the projection area limits visible / off
- Select
 >
>  User Preferences >
  Drawings, Models.
 - Select View.
- Select or clear Show detail view limits.
- Select OK.
- Select
