Collar Beam
Framer
Add the joint in the model window.

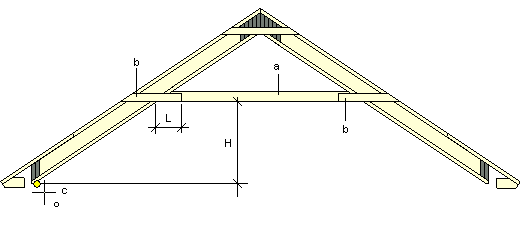
a = Collar beam
b = Fixing profile
c = Point determining the height
- Select Modeling | Panel |
 Floor
Floor 
 Framing
Accessories. The browser is opened.
 - Select the Roof Accessories folder in the browser.
- Select Collar beam.
- Select the parameters in the dialog box:
- Collar beam height from clicked point (H) - The distance of the collar beam's bottom edge from the point you clicked (c).
- Code - Select a cross section for the collar beam (a) from the profile library by clicking the Select button.
- Library - The library containing the collar beam cross section.
- Fixing profile overlap at collar beam (L)
- Code - Select a cross section for the fixing profile (b) from the profile library by clicking the Select button. The fixing profiles are added on both sides of the beam.
- Library - The library containing the fixing profile cross section.
- Confirm by clicking OK.
- Select the rafters between which you wish to add the joint. Select the beams one by one or use area selection. You can select several pairs of beams at once.
- Select Confirm.
- Define the height of the bottom edge. Click the point in the model (c). If you selected a value for the parameter Collar beam height from the clicked point, the bottom edge will be positioned at the distance determined by the parameter from the point you clicked.
 Note
Note
- The program will automatically create a rafter structure of the joint components, allowing you to use floor and roof panel design functions on it. You can, for example, generate a panel drawing of the joint components, or delete both the panel information and the joint components.

