
Continuous Baseline Dimensioning
Start baseline dimensioning by selecting the start and end points, and the position of the first dimension by clicking on the projection. After this, you need only select the end points for the following dimensions.
- Select Drafting | Dimensions |
 Fast Dimensioning >
  Continuous Baseline.
 - Select the dimension properties.
 Dimension Properties (2D)
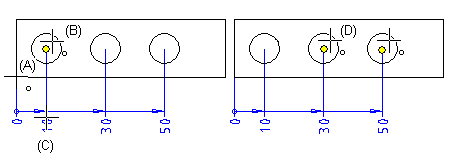
 - Select the start point (A) of the dimension.
- Select the end point (B) of the dimension.
- Select the position of the first dimension (C).
- Do either of the following:
- Continue baseline dimensioning by clicking another end point (D).
- Select Confirm.
Note:
- You can select
 Parallel to Line Direction or
  Perpendicular to Line Direction as the dimensioning direction when adding the first dimension. The rest of the dimensions are added in the same direction. If the direction of the line defining the dimensioning direction changes after the dimensions have been added, the direction of the dimension will not change. The dimension retains its original direction.
 - If you want to move the position of several parallel dimensions at once, select dimension figures, and Set function.
- A zero is displayed by default at the start point of a chained linear dimension. If necessary, you can disable it in use. Select Drafting | Dimensions | Fast Dimensioning >
 Settings, and on the Misc tab, clear the option
  Draw zero to begin.