
Moving an Object by the Grip Point
You can move an object in the drawing or in the model by moving the square grip point. When the grip point is used, the reference point for which an offset is defined will always be at the grip point. If you want to select a reference point for the object, use the context-sensitive menu function Move. You can move windows and doors only in the direction of the wall.
 You cannot move an object bound with
a constraint using this function. Constraints are used in designing a parametric building
model.
You cannot move an object bound with
a constraint using this function. Constraints are used in designing a parametric building
model.
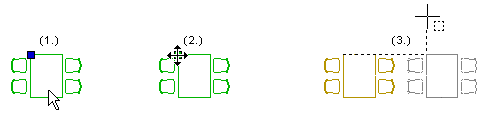
- Select an object.
- Click the square grip point.
- Select a new location for the grip point.
Before selecting the new location for the object, you can select functions from the auxiliary menu to, for example, rotate the object or change its height.
You can also rotate the object in the xy plane by using keyboard commands. The changing angle is displayed on the status bar (the value of the gamma angle will change).
- at intervals of 45° by using Page Up and Page Down
- at intervals of 5° by using the Up and Down arrow keys
- at intervals of 1° by using the Left and Right arrow keys.
 Note
Note
- If you want to move several objects at once, use the Move function in the context-sensitive menu.
- If you want to move a wall so that the floor edge is moved along with the wall, use the Stretch function in the context-sensitive menu. Select the objects by limiting an area.
- You can rotate an object by using the keyboard commands when the ../user/SETUP file contains the keyword set.vertex.grouparrowrotate= 2.
- If the selected object is, for example, a line or wall, the program will add round grip points at the endpoints of the object. You can change the length and direction of the object by moving the round grip points. If the object is an area, for example a floor, the round grip points are added in the mid and end points of the edge lines. You can change the shape of the area by moving the round grip points. See Stretching from the Grip Point.