
Print Settings
Define the print settings such as the printer, scale, plot area, layers to be printed, and placement of the drawing in the Print dialog box.
The content of the dialog box can vary depending on what is printed (drawing/model) and whether there are more sheets in the drawing.
- Printer
- The list shows the printer options: Windows and Vertex printers. Select a suitable printer.
- Properties
- Open the default settings of the Windows printer for viewing and editing. The printer properties include paper size, source, number of copies, orientation (portrait/landscape), print method, resolution, etc.
- Sheet
- When you select a printer other than a Windows printer, you must select the sheet size. A default sheet can be defined when adding a printer.
- Scale
- The scale determines the size of the drawing to be printed in relation to the sheet size.
- The Fit to sheet scale will make the drawing as large as possible on the sheet. With this setting, the drawing is not in scale.
- By selecting From picture, the scale is determined by the scale of the drawing. Select the sheet so that the drawing fits on the sheet.
- The Fit to sheet scale will make the drawing as large as possible on the sheet. With this setting, the drawing is not in scale.
- Number of copies
- The default value is 1. Enter a new value, if necessary.
- Quality
- When you print a model you can select one of the following options as the method of configuration:
- Wire Frame - Vertex wire frame model with hidden lines removed.
- Shading - The model elements are shaded in solid colors.
- White background - The model elements are shaded in solid colors, the background is white.
- Rendering, fast - Materials, lights and background are taken into account. The transparency will not be calculated.
- Rendering, normal - Same as fast, in addition the transparency is calculated.
- Rendering, best - Same as normal, in addition the sharp color differences are softened.
- Plot area
- Defines the drawing area to be printed.
- All - The entire drawing will be printed.
- Window - Select the print area in the drawing by clicking two corner points. Click the lower left corner point and upper right corner point, or enter the area coordinates in the fields Xmin, Xmax, Ymin, and Ymax.
- Sheets - Allows you to print all sheets or selected sheets in a multi-page drawing.
- Layer selection
- The geometry in a drawing has been drawn on certain layers. Define the drawing layers to be printed. The preview image shows the geometry on the layers selected for printing. Select one of the following:
- Pages
- Accept or enter the page numbers (drawing sheets) you want to print.
- This option is available only if the drawing contains two or more sheets.
- You can browse drawings using the scroll bar below the preview image.
- By default, the program suggests printing all sheets (e.g. 1-5).
- Printer Settings
- Change the printer settings such as the printer name, driver and the printing of lines, colors, text, etc.
- Define new printer, Delete current printer
- Add or delete a printer.
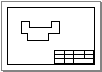
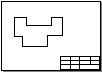
- Place drawing
- Position the drawing on the sheet by using the Place drawing function. By clicking the button in the middle, you can place the drawing in the middle of the sheet. By clicking another button, you can move the drawing 5 mm in the direction of the positive or negative axis. The offset will be shown as coordinates X and Y. You can also enter coordinate values in the text fields.
- Add Drawing to Sheet
- You can add several drawings to the same sheet. This requires that you have selected a sufficiently large sheet.
- Default sheet layout
-
When you print a drawing and select the sheet size, scale, plot area, drawing position and rotation, you can save these selections to the drawing and use them the next time you print.
Click Set to save the settings. After printing, also save the drawing to retain the setting in the drawing. The next time you print the drawing and want to use the same options, select Use.