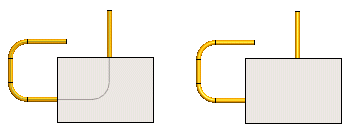
Visibility of Assembly Reference Geometry
You can toggle the visibility of reference geometry in the assembly model.
The reference geometry of an assembly includes:
- A 3D sketch
- A guide curve of a planar sketch
- Cross Section
- A center line of a pipe component
Show and hide the reference geometry with tool strip's function Show Reference Geometry or by pressing G key.
For example, the center line (guide curve) of a pipe line can be hidden in the assembly model.

Note:
- Vertex G4 Plant: The reference geometry is always displayed when you are adding a pipeline or pipe component. The reference geometry of models that contain volumes is also displayed. If you select
 Reference Geometry Visible, the pipe center lines will always be displayed, along with the auxiliary geometry of models that contain volumes. The setting facilitates searches, as the visibility of the geometry in the background can be adjusted.
 - You can hide the reference geometry also in the drawing of an assembly model by projection specific by selecting
 Reference Geometry Visible.

