
Covering Symbol or Covering Component
You can create a covering symbol or covering component and save it in the symbol library.
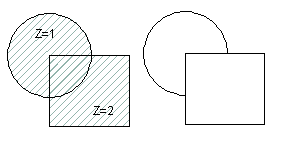
Overlapping symbols can be visualized in a drawing, when a symbol that is placed over another symbol has been defined as covering.
Creating a Covering Symbol
- Draft the shape of the symbol as an unbroken shape line in the drawing.
- Add section lines inside the unbroken shape line on the 101 layer.
- Make a group out of the shape and section lines.
- Update the limits of the drawing by selecting the context-sensitive function Update.
- Select the group, and on the
 tab, in the Symbols group, select
  Save As Symbol.
 - Name the symbol, and select Save.
- Select Ordinary Symbol.
- Select OK.
Add a Covering Symbol
- Select a covering symbol from the library.
- Select a Z coordinate value for the symbol.
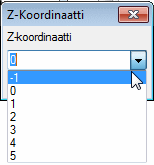
Overlapping symbols have a different Z coordinate value (Z>0), so that the symbol with the larger Z coordinate covers the symbol with the smaller Z coordinate.
- You can change the Z coordinate value by first selecting the symbol in the drawing and then selecting a new Z value in the contextual toolbar field.

- The covering property can be seen when you hide layer 101 from view and remove the hidden lines.
Create a Covering Component
You can define the covering property for a 2D component in the same way as for symbols. See section Creating a Covering Symbol.
Save as a component. On the tab, in the Symbols group, select  Save Component.
Add a Covering Component
- Add a covering 2D component to the drawing.
- You can change the Z coordinate value by first selecting the component in the drawing and then selecting a new Z value in the contextual toolbar field.