
Add Multiple Items to a Model
General
- A part and assembly model can describe a number of products that differ slightly. These are achieved in Vertex G4 with configurations.
- In the different configurations of a part model, the part may appear with different dimensions, and the configurations of the part may differ from each other in terms of the number of (visible) features.
- The different configurations of an assembly model may differ depending on the number and position of the parts and the dimensions of the parts.
- For each item, you need a specific configuration. However, one item can be described by more than one configuration, such as the bent and flattening shapes of a sheet metal model.
Starting point
- A part or assembly model has more than one configuration, and they describe products that are somewhat different from each other.
Create items:
- In the feature tree, click Configurations.
- You can also first check that the model has configurations by clicking the arrow
 next to the configuration.
- You can also first check that the model has configurations by clicking the arrow
- Select the context-sensitive function Configuration Data.
- The program opens the dialog box Data for Configuration.
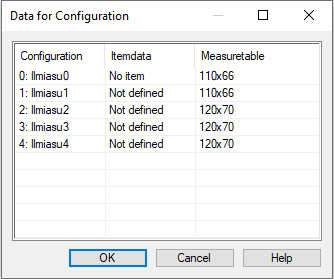
- Note that the Measure Table column is missing from the assembly model dialog box.
- The program opens the dialog box Data for Configuration.
- Click the Item Data field on the first row .
- The program opens the dialog box Item Data - Material Data.
- Fill in the item and material data.
- Confirm the data by clicking OK.
- Click the Item Data field on the next row.
- The program asks: Set Item to Configuration?
- Answer Yes, if you want to connect a new item to the selected configuration.
- The program asks: Do you want change model to table model?
- This question is no longer asked when adding a third item, etc.
- Answer Yes, if you want to connect another item to the selected model.
- The program opens the dialog box Item Data - Material Data.
- The program generates the item label from the first item, followed by a hyphen and a running number. You can change this label or get it from the item database.
- Fill in the item and material data.
- Confirm the data by clicking OK.
- Repeat steps 6, 7, 9, and 10 to continue creating new items.
- Click OK in the Data for Configuration dialog box, when you are finished adding all the necessary configurations.
Note: You can also add or edit the item data of the configuration as follows:
- Show all of the model's configurations by clicking the arrow in front of the Configurations section.
- Click the configuration whose item data you want to view, or for which you want to create an item.
- Select the Item Data function from the context-sensitive menu.