
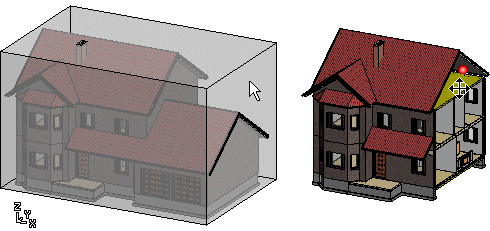
Set 3D Limits
You can restrict the visibility of an object using a planar face. The planar face can be a face in the direction of the coordinate axis, or a face in the direction of a face indicated in the model. When you move the limiting face in the model, the objects are cut.
- Do one of the following:
- Select
 Set 3D
Limits from the tool strip.
Set 3D
Limits from the tool strip. - Select View | Limiting |
 Set.
Set. - Right-click to open the context-sensitive menu, and select Set 3D Limits.
A rectangular polyhedron is drawn around the model.
- Select
- Do either of the following.
- Select a face of the rectangular polyhedron around the model as the limiting face.
- Press the Delete key, and select any surface in the model as the limiting surface, for example a roof slope surface.
- Move the limiting face using the mouse.
- Select the limit point by clicking the left mouse button.
- Do either of the following:
- Continue by limiting the model in the direction of another face.
- Select Confirm. The limited model remains visible.
- Press the Esc key. The entire model is restored visible.
 Note
Note
- You can save the model's view limited with a planar face, see Save a Custom View.