
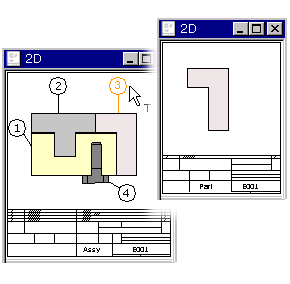
Drawing Link
Vertex G4: Open another drawing from a part number in the drawing. The opening drawing is linked with its item data to the part number of the drawing in the working window.
For example, you can use a drawing link in an assembly drawing, in which you want to open the drawing of a component or subassembly.
- On the
 tab, in the Part
Number group, click
tab, in the Part
Number group, click  Drawing Link.
 - Click the element in the drawing. The drawing linked to the selected element opens in a new window.
Adding a Drawing Link
You can add a drawing link to a drawing, if the drawing being linked is an archived drawing or a Flow drawing and item data has been defined for the drawing.
 Creating a Linkable Drawing
Add a drawing link as follows:
- Open the archived drawing, to which a drawing link will be added.
- Add the part number.
- Add part data for the part number as follows:
- To obtain the item data for the drawing to be linked, click
 in the Label field. All the
item data will be displayed in a list if you clear the Class Selection window.
in the Label field. All the
item data will be displayed in a list if you clear the Class Selection window. - Select the item data of the drawing to be linked from the list.
- Select OK.
 For a model drawing, the part
item data is received from the model.
For a model drawing, the part
item data is received from the model. - To obtain the item data for the drawing to be linked, click
- Save the drawing.
- Select
 Collect Parts
List and the Transfer to Item Database option.
Collect Parts
List and the Transfer to Item Database option.
Creating a Linkable Drawing
You can attach an archived drawing to a drawing link, if its item is in the Product Database. The drawing can be a drawn drawing or a model drawing.
- Enter the following information for the drawing:
- When creating a new drawing, enter the drawing archiving data. Enter the label of the item in the archiving data. For example, you can accept the same label for an item as the label of the drawing.
- You can enter the item data of a model drawing in the part properties. You can supplement the drawing archives data when saving the drawing.
- Add the part number to the drawing.
- Add the part data for the part number using the
 Part Data function.
- Select the material data for the Label field by clicking .
- If necessary, complete the data and accept the data.
For a model drawing, the part
item data is received from the model. - Select the material data for the Label field by clicking
- Save the drawing.
- Select Collect Parts
List and the Transfer to Item Database option.
- If necessary, complete the item data, and confirm the data.