
New Assembly to Archive
New Assembly to Archive
- Select
 >
>  New.
New. - Define the document data in the dialog box.
- Select

 Assembly.
 - Name the part in the Label field.
 Name a Document
 - You can supplement the part's archive data by clicking the button.
- Select Add to Archive.
- Select
 To project when creating a document for a specific project. Activate an existing project by clicking the button, or create a new project by clicking the button.
- Select
- Click OK.
- Start modeling the new assembly in the working window.
Note:
- Create a new part by pressing Ctrl+N.
- If there are a lot of parts and subassemblies in the assembly, collapse the assembly tree by pressing Shift+Left Arrow.
New Link Assembly
- Activate the working window.
- Select the context-sensitive
 New.... function.
 - Select Assembly.
- Name the assembly in the Label field. For example, LinkAssy, and click OK.
You will see a new link assembly in the tree.
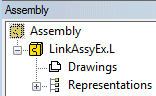
Figure 1: A dot followed by the letter L after the label indicates a link assembly.
New Local Assembly
- Activate the working window.
- Select the context-sensitive New.... function.
- Select Assembly.
- Name the assembly in the Label field. For example, LocalAssy.
- Select Local.
- Click OK.
You will see a new local assembly in the tree

Figure 2: A local assembly is only indicated by the label.