
Save an Image of the Model
General
- The function defines what kind of image of the model is printed.
- You can define the image size in pixels and you can give a multiplier to that image size.
- You can set the background to white and you can also print the image as rendered.
- Is related to the dialog box function Save picture of Assembly | Tools |
 Explode.
 - Is also related to the function
 >
>  Export >
  Save in Another Format when JPEG images /*jpg; *.jpeg are selected as the file type.
- But it is not possible to save a rendered view in this operation.
Save an Image of the Model
- Select Assembly | Tools | Explode.
- The program opens the dialog box Transitions at Exploded States.
- Determine the Exploded States of Parts.
- Select the Save picture function.
- The program opens the Windows dialog box Save As.
- Select the directory, enter a file name and select OK.
- The program opens the dialog box Image Properties.
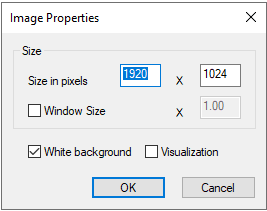
- The program opens the dialog box Image Properties.
- Accept or enter the image size as pixels.
- The default size is 1920*1024.
- Select Window Size if you want to save the image in the size that the model's window is currently on the screen.
- If necessary, give a multiplier for the size of the window.
 Note that the file size of the image increases dramatically if you use a large multiplier.
- Select White background to hide any colored background in the model window.
- Select Visualization to save the image in a rendered format.
- This option is not available in the function > Export > Save in Another Format.
- Select OK.
- The program creates a rendered image and opens it with a separate program.