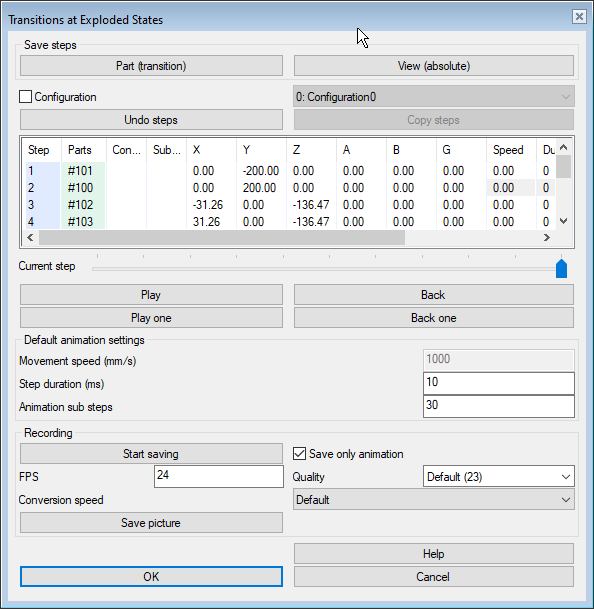
Determine the Exploded States of Parts

Dialog Box Options
- Part (transition)
- Drag the part or parts to the locations you want and accept the locations by selecting
- Click Part (transition) or
- select the context-sensitive function
 OK or
OK or - click the middle mouse button.
- View (absolute)
-
Include a specific viewing direction in the explosion configuration, for example in the beginning. Place the assembly in the desired position in the working window and select View (absolute). The program will generate a step in the table in the position of the preview slider.
- Configuration
- You can create different explosion presentations, one for each of the assembly's configurations and determine the visibility of each step in different presentations one by one. Select a target configuration from the list. If you want the same presentation in all configurations, leave the check box unselected.
- Undo steps
-
Clear the explosion table of all explosion steps by selecting Undo steps.
- Copy steps
-
Copy a transition from a part that you have already moved to the desired exploded position. The function does not create a new step for the transition to the table, but adds the part in the Parts column of the step in question.
- Select the part to which you want to copy the same transition as the previously moved part.
- Click Copy steps.
- Click the part from which you want to copy the transition.
- Explosion Table
- The explosion table displays the steps of the explosion.
- Learn more about the meaning of the columns and the tools in the explosion table: Edit the Explosion Table Values
- Current step
-
Select a specific moment in the explosion configuration with the slider. The new steps are added in the selected moment.
- Play
- Watch the explosion configuration from the selected moment to the end.
- Play one
- Watch the explosion forwards one step at a time.
- Back
- Watch the explosion configuration from the selected moment to the beginning.
- Back one
- Watch the explosion backwards one step at a time.
- Stop
- When playback is in progress, the Play, Play one, Back, and Back one buttons change to Stop.
- Movement speed (mm/s)
- Change the explosion's speed by typing a speed in the field. The original default speed is 1000.00 mm/s.
- Step duration (ms)
- Change the explosion's duration by typing a step's duration in the field. If you want to change the default speed, set value 0 (zero) in the field.
- Animation sub steps
- Define the number of sub steps in which a step of the presentation is represented. By default the value is set to 10. A larger value smooths the animation movement, but requires more performance from the hardware.
- Start saving
- First, define the saving location for the video and begin to record. When the software records, the button’s name changes to Stop saving.Note: The duration of the video may be shorter than viewing the animation on the screen. If the video is too fast, you can for example increase the Step duration setting’s value.
- Save only animation
- Record an exploding presentation or only an animation on the videos. If the check box is selected, the software saves only animation phases on the video. If it is not selected, the software saves the whole presentation.
- FPS
- Define the desired frame rate (frames per second) in the field. A higher value creates smoother result but the size of the file increases. By default the value is set to 24. For example the value 60 is used in video games.
- Quality
- Select a setting in the drop-down menu or enter a value between 0-51. By default the value is set to 23. A higher value reduces the file size but then the software removes video’s data. Zero is lossless, but all applications may not be able to open a lossless video.
- Conversion speed
- Define how long the converter spends to optimize the video. Select the setting from the drop-down menu. Lower speed improves video’s quality.
- Save picture
- Save a picture from the explosion window.
- For more details, see: Save an Image of the Model
