Platform, Stairs, Railing
Piping Design

Platforms and stairs can be added by selecting components from the pipe library. The components are adaptable and they feature handles at their ends.
- Add Platforms and Stairs
- Add Platform, Stair or Railing Component
- Edit Platform or Stairs
Add Platforms and Stairs
When adding platforms and stairs, the class is the selection criterion defined by the user. By default, the components are classified according to the edge profile type. The size refers to the width of the platform grate or step.
Route platforms and stairs in chains. Indicate the center line of the path.
- On the
 tab, in the Platform group, select
  Add Platforms and Stairs.
 - On the
 tab, in the Properties group, select Class and Size.
 - On the tab, in the Component group, select
 Add platform or Stair component and return back to routing.
 - Select the component in the Browser.
 Browser - Archives
 - Select a component by clicking the following field in the toolbar row:
- Platform – Platform properties.
For example:

- Stairs – Stair properties.
For example:

- Platform – Platform properties.
- Select either of the following:
 Trim by Lengthening Previous (default).
 Trim by Shortening Previous.
 - Continue as follows:
Add Platform
- Route the platform by indicating the center line points through which to add the platform on the XY plane.
- Change the sweep direction on the plane using the Arrow Right or Arrow Left key.
- Begin routing at the edge of the platform. Click a suitable edge line and continue routing in the same way as when using a handle.
- Begin routing from the end of an existing platform by clicking the handle. The previous platform will be continued by default.
Add Stairs
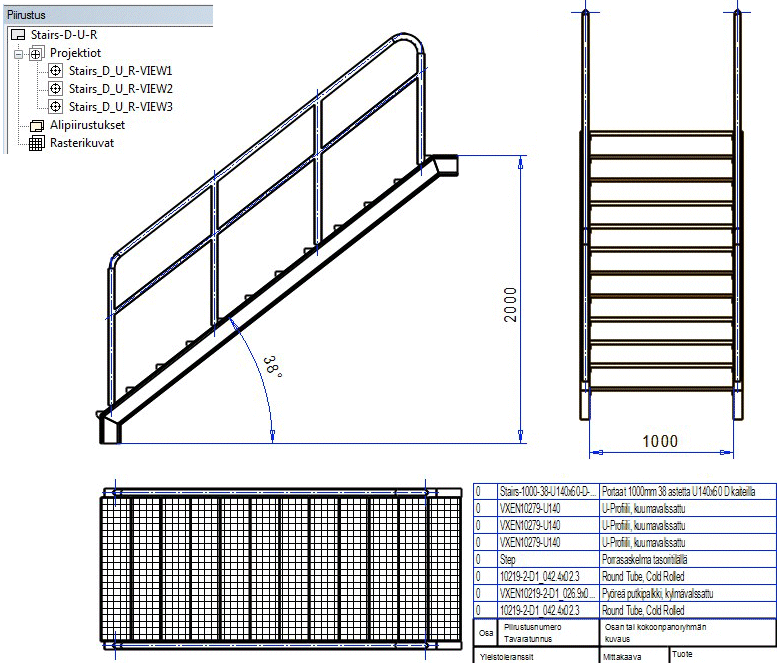
- When routing, add stairs using the Arrow Up or Arrow Down button. Stairs are saved in the library based on their pitch – 38 degrees, for example. By default, the stairs are added with dimensions attached.
- Define the height of the stairs by using coordinates.
- With the cursor's direction you can determine whether to proceed upwards or downwards. After adding stairs you will return to adding a platform and so on.
 If you add a single component, you can only rotate the component in relation to the Y axis defined for the component's handle. This means that the component will only rotate around the Z axis (the Y axis points upwards).
 - Select Confirm.
Add Platform, Stair or Railing Component
Add a single component.
- Select
 Add Platform, Stair or Railing Component from the toolbar.
 - The
 stairs folder is selected, for example. Select the desired folder in the browser.
 - Enter a more specific search term in the field for the component selection. Browser – Archive
- Select the item from the search result.
- Edit the component data in the dimension table, and click OK.
- Click a position.
- Select Confirm.
Edit Platform or Stairs
- Select a platform or stairs in the assembly tree.
- Select the context-sensitive function Dimension Table.
- Edit the dimension values.
- Select either of the following:
- You can set the dimensions as fixed by selecting
 Fixed. If you do this, the components will not stretch in the assembly solution if the component is dragged or moved with the Move function.
 - If you select
 Fixed, the components will be stretched.
- You can set the dimensions as fixed by selecting
- Select OK.
- Platforms and stairs can also be edited like normal assemblies. For example, platforms with railings and edge profiles can be trimmed to connect and be resolved, and railings can be added and removed.
For example – Drawing from a Model