
Add Opening Trims
Architectural
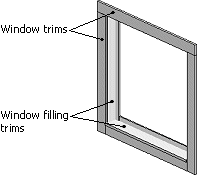
You can use this function to add opening trims to windows or doors. The trim types are customer-specific. The trim types are sets including trims, filling trims and siding trims for inside the wall. You can also select only filling trims or siding trims.
Log walls have their own trim types. You can also select a Wrap type trim set. You can use the Wrap type to add trims to round or triangular shaped windows, or around a combination of openings of different sizes.
- Select the opening. You can select more than one object by pressing and holding the Ctrl
key. You can select all openings of the same basic type as follows:
- Select one window or door.
- Press Ctrl+A. All objects of the same type will be selected.
- Select Window or Door | Trims |
 Trims.
 - Select the trim type from the list. The preview window displays the selected opening trims when the check box Preview is selected.
- Confirm by clicking OK.
- If there are already trims in the opening, you will be prompted: "Delete existing trims?"
Do either of the following:
- If you want to delete the existing trims, select Yes.
- You can leave trims in a window, for example when a trim set added earlier does not include the filling trims or siding trims that you are now adding. Select Only Selected.
 Note
Note
- The geometry of the trims will only be displayed in the 3D model of the building.
- Common trims are added around several openings when the openings form a building component assembly. When adding trims, the program automatically interprets openings close to each other as an assembly. The maximum distance between openings forming an assembly is defined in the BDSX keyword group with the keyword opng_comb_dist. If the distance is longer than this, you can combine the openings into an assembly by using the Create a Building Component Assembly function.
- You can edit a trim set by deleting, adding or editing single trims. An edited set can be saved in a separate trim library - see Edit Trims. Please note, that the changes made to the opening, for example moving the opening, will not be automatically refreshed in the trim set you edit manually.
- You can also select the function in the following ways:
- Select Modeling | Wall Layout | Trims.
Select the opening type, and click the openings.
- Click a window or door, right-click to open the context-sensitive menu, and select
 Insert Opening
Trims.
Insert Opening
Trims.
- Select Modeling | Wall Layout |