Mark the Revision Area in a Drawing
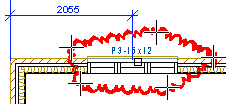
You can mark the area in a drawing to which the revision information applies. Mark the revision area by adding the edge line of the area to the drawing. The default layer for the edge line is 245, Red Pen Markings.

- Do one of the following:
- Right-click in the active document to open the context-sensitive menu and select Active Document Data from the menu.
- Select Archives | Buildings |
 Edit Data
 Edit Document
Data.
The Project Document Information database view is opened. If you opened the database view with the
 Edit Document
Data function, you can browse the documents with the cursor keys arrow up
and arrow down.
 - Activate the Document Revisions database view under the Project Document Information database view.
- Move the cursor over the row with the desired revision information.
- Click the Rev. Area button. The drawing window becomes active.
- Select line points.
- Select Confirm. A line is drawn between the point clicked last and the start point of the polyline.
- If necessary, you can add more polylines in the same way.
- Quit adding lines by pressing the Esc key. The Project Document Information database view and the Document Revisions database view will reopen.
- Close the database views by pressing the Esc key. If you made any changes to the document data or revision information, save the changes by clicking the OK button.
 Note
Note
- The default line properties are defined in the addrevarea application development program located in the ../macros/triggers folder.
- You can edit the revision area's edge line just like any other 2D line.
