
Baseline Dimensioning
Select the start point and end point of the first dimension, and the position of the first dimension. After this, you need only select the end points for the following dimensions. Dimensions are automatically placed at equal distances from each other.
- Select Drafting | Dimensions |
 Fast Dimensioning >
  Baseline.
 - Select the dimension properties.
 Dimension Properties (2D)
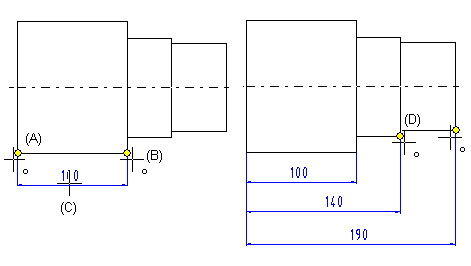
 - Select the start point of the dimension (A).
- Select the end point of the dimension (B).
- Click the location of the dimension (C).
- Select the next end point (D).
- Select Confirm when you have selected all the endpoints of the baseline dimension.
- To add a new baseline dimension, select the start point, end point, dimension number location, etc.
- Quit by pressing the Esc key.
Note:
- You can select
 Parallel to Line Direction or
  Perpendicular to Line Direction as the dimensioning direction when adding the first dimension. The rest of the dimensions are added in the same direction. If the direction of the line defining the dimensioning direction changes after the dimensions have been added, the direction of the dimension will not change. The dimension retains its original direction.
 - You can remove or add dimension points by using the function Edit Chain.