
Create Your Own Drawing Sheet
Create own sheet by editing an existing sheet and saving it as a sheet symbol. Using a sheet symbol as a drawing sheet requires that it has been provided with the required references.
Open a sheet in symbol editor
- Open the symbol editor by selecting
 tab >
Symbols group >
tab >
Symbols group >  Editor.
 - Open the symbol browser by selecting tab >
Symbols group >
 Browser.
 - Open an old sheet for editing. For example, type Drawing sheet in the search field at the top of the browser and press the Enter key to start the search.
- Drag the symbol to editor. You will be prompted to confirm the function. Edit symbol in the editor by selecting Yes.
 Note
Note
- You can remove the sheet’s logo by selecting it’s area and pressing Delete.
Set the reference points for the coordinate system
- Make sure that the sheet’s locationing point
 is in the lower left corner of the sheet.
If necessary, move the point by selecting
is in the lower left corner of the sheet.
If necessary, move the point by selecting  tab
> IO edit group >
tab
> IO edit group >  Move.
Move. - Add data to text points
 that are
along the sheet’s edges. They define the coordinate system for the sheet. Select tab > IO edit group >
that are
along the sheet’s edges. They define the coordinate system for the sheet. Select tab > IO edit group >
 Data.
Data. - Select the first text point for editing. The software opens I/O point definition dialog box.
- Add text point’s number or letter that you want to see on the sheet in the field
Default text, for example 11 or A. Add text point’s coordinate in X
or Y direction in the field Description/Hidden text. The general
annotation is as follows:
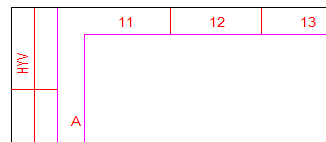
- Align the text better if necessary.
 Change the Position Point of a
Text
Change the Position Point of a
Text - Define the data to all text points along the sheet’s edges.
Define the sheet’s fields
- Add a text point to the sheet’s
field. Select tab > IO
add group > Text. Insert a point on the sheet.
- Add text point’s data. Select tab >
IO edit group > Data. Select the first
text point for editing. The software opens I/O point definition
dialog box.
- Add text point’s description that you want to see on the sheet in the field Default text, for example DWGNAME. Select text point’s reference from the drop-down menu in the field Description/Hidden text. The ALIAS file’s abbreviations are available.
Save the sheet
- Select tab >
Symbol group >
 Save. You will be
prompted to confirm the function. Save the sheet with a new name, select Save
as.
Save. You will be
prompted to confirm the function. Save the sheet with a new name, select Save
as. - Define the sheet’s information, for example the name and description.
- Select OK.
Use the sheet
- Select tab > Symbols
group >
 Forms.
 - Select your sheet from the list.
- Change the sheet’s Type to Add as a macro from the drop-down menu.
- Select OK.
Note
- You can create your own drawing form in other ways also. Read more on Vertex Documentation page:
https://kb.vertex.fi/vxinfoen