
Distant, Point and Spot Light Properties
Rendering
Define the light properties: intensity, is the light on or off, color, location, direction and shadows.
Dialog Box Options
- On
- Switch the light on (default) or off.
- Use as OpenGL light
- Switch the feature on or off (default). If you use the light as OpenGL light, it is seen also in workspace in addition to the Rendering space.
- Name
- You can name the light. It will be easier for you to recognize the light in the light table.
- Intensity
- The intensity can have values 0-1. If you change the value, you can see the change of the intensity in the model at once.
- Light falloff
- You can select this property for a point light and a spot light. Select one of the following:
- Light color
- White light is the default. You can define the color in the following ways:
- Shadows
- Select whether the light creates shadows or not. Edit the variable values of the shadows by clicking the Values button. You can change three variables: resolution, softness and quality. Select a new value from the list or enter a numeric value in the field. Following numeric values are possible:
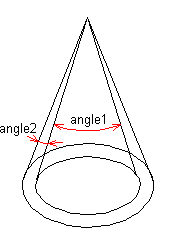
- Light cone
- You can select this property for a spot light. Click the Values button, and enter numeric values in the fields. The numeric values are as follows:
- Binding
- You can bind a point light and spot light into a point in a part model. This function is not active in an assembly model. You can select auxiliary functions for specifying the connection point.
 Bind a Light
- Location
- You can define the position of an eye light and spot light in a model. You can select auxiliary functions for specifying the position.
- Light Position
- Direction
- Point light illuminates spherically in all directions. Its beams begin from the position point and are evenly distributed.
- Light Direction
- Rotation, Height
- Define the position and direction of distant light by moving the Rotation and Height sliders. Rotation is the direction of the incident sunlight. It can be adjusted 0 to 360 degrees around the model.
 You can set the position and direction of a distant light to zero, whereupon the light direction is relative to an angle. The incidence angle of a relative distant light no longer needs to be edited, when the viewing direction to the model is changed.
- Render
- The model in the working window will be visualized, when you click the button.
- Advanced
- The function opens the Light Edit dialog box in which you can edit the shader properties of the light.
- Light Shading Properties