
Scanning Point Views of Point Clouds
Point clouds
The original scanning spot view can be saved in the point cloud file. If the point clouds of the active model contain scanning points, you can use this function to browse all views and set on the desired option. Scanning spots can also be used as a starting point for flying in the model. Photos taken of the scanning target can be saved in the point cloud file in file format E57. You can view photos through scanning point views.
- Select Point clouds | Tools |
 Views. The Views from Scanning Points dialog box opens. The default view opens in the model window.
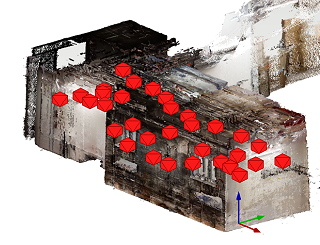
 - Select Point clouds | Tools | Views > Show scanning view locations. The locations of the scanning points are displayed in the point cloud model. Click on the symbol of the desired point to open the Views from Scanning Points dialog box. The selected view opens in the model window.
At the top of the dialog box, the point clouds in the active model are displayed, from which you can select the cloud to be viewed. The list box displays the scanning point views for the point cloud. You can activate a view in the list or click the location symbol for the view. If a point cloud consists of only one scan, only one viewpoint is available.
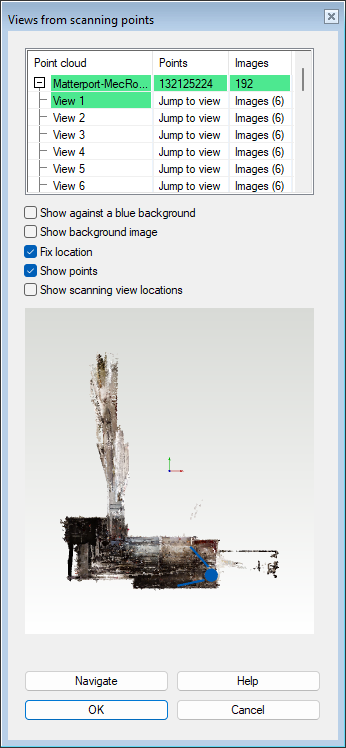
Dialog Box Options
- Show against a blue background
- Replaces the normal background color of the model's model window with a shade of blue. The feature can be used in cases where you want to more clearly separate the points and the background, for example.
- Show background image
- When the feature is selected, you will see a 3D view created using photos taken from that point. You can rotate the camera and zoom, but you cannot move (Fix location is selected). If necessary, clear the Show points option to hide the points of the point cloud in the model window.
- Fix location
- The feature is available when the background images are not displayed. When the feature is selected, rotating the camera works as with background images. You can change location by jumping from one scan point to another or by clicking a location on the map.
- Show points
- When the feature is selected, the point cloud is displayed in the model. You can hide the point cloud by clearing the check box.
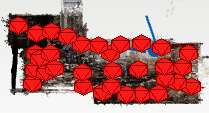
- Show scanning view locations
- When the feature is selected, the locations of the scanning views are displayed in the model window view and in the map at the bottom of the dialog box. You can activate the view by clicking the location symbol in the model window or on the map. In the view in the model window, the program draws nearby scanning points with larger symbols than the distant ones.
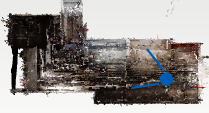
- Map (mini-map)
- A map (mini-map) is displayed at the bottom of the dialog box. The map shows where you are in the point cloud and which direction you are looking. When Show scanning view locations is selected, the locations of the scanning views are displayed on the map. To activate a view, click the location symbol on the map.
- Symbols shown in the mini-map:
- The blue ball shows the location of the active view. The sector formed by two lines indicates the area that the user sees in the model.
- The locations of the scanning point views, if they are set to be visible.
- The blue ball shows the location of the active view. The sector formed by two lines indicates the area that the user sees in the model.
- Navigate
- After selecting a scanning point view from the list, click Navigate, and you can start moving from this point. You can return to the dialog box by pressing the Esc key. If Show background images is selected, the program automatically turns off the feature.
 Point cloud > Views from scanning points that opens by right-clicking.