
Draw a Detail
Start a new drawing by using the function  >
>  New,
and use the 2D drawing functions (lines, hatches, texts, dimensions) to create the drawing. At
this point, you can save the drawing to a desired folder. When you create a detail of the
drawing by using the function Save Drawing as a Detail, the
program saves the drawing file in a detail archive located either in the custom folder or in
the project folder according to your choice.
New,
and use the 2D drawing functions (lines, hatches, texts, dimensions) to create the drawing. At
this point, you can save the drawing to a desired folder. When you create a detail of the
drawing by using the function Save Drawing as a Detail, the
program saves the drawing file in a detail archive located either in the custom folder or in
the project folder according to your choice.
Scalability
The texts, dimensions, lines and hatches in the detail drawing must be scalable. This way, the size of the detail added to the project's floor plan drawing will remain the same in relation to the other elements in the drawing even if you change the drawing's scale.
- A text or dimension is scalable when its property Height is scalable.
- A line is scalable when its property Scale is scalable. The scalability of line spacing is relevant when dealing with dotted and dashed lines, for example.
- A hatch is scalable when its property Scale is scalable.

The properties mentioned above are scalable when they have negative values.
Detail's Reference Point
The origin of the detail drawing will be set as the reference point of the detail.
Detail Label to Floor Plan Drawing
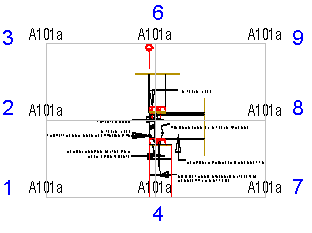
When you add a detail as a drawing, the detail label is also added to the floor plan if the keyword detail_label_lorg in the BDSXX keyword group has a value from 1 to 9. The value defines the label location in relation to the detail drawing as shown in the diagram below. If detail_label_lorg = 0 (default value), the label is not added.
If you wish to select the location of the label in relation to the detail, add the label as a text macro to the detail drawing. The detail label will be loaded to the text macro when you add the detail to the floor plan drawing. Add a text macro as follows:
- Select Drafting |
 Text.
Text. - Type in the text field LABEL, for example.
- Type in the Hidden Code field:
#DETAIL_ID#
- Click OK to close the text editor window.
- Click the text location.
The text LABEL will be replaced with the detail label when you add the detail to the floor plan.
You can add the detail's "display label" to the drawing in the same way. Type in the Hidden Code field: #DISPLAY_ID#.
Multilingual Texts Layers
The default layer of text is 3. Add texts in the default language to this layer. If you need multilingual details, add texts in other languages to their own layers: English 131, German 132, Swedish 133, Finnish 134 and Russian 135.
The basic software delivery includes predefined layer groups for details in different languages. When the layer group of a certain language is active, only the texts which have been translated to that language and added to the above-mentioned layer are shown in the detail drawing in addition to the detail geometry.
The layer groups enable the automatic generation of preview files in different languages, when the detail archive is in DesignStream system.