
Automatic Routing
Piping Design
You can automatically route a pipe or duct line to the end once you have clicked the starting point of the line and specified the initial direction of the routing.
The software tries to generate the line with a preference for perpendicular direction changes, taking the directions of the model's main axes and the grip points at the starting and ending points into consideration.
The benefits of automatic routing are greatest in situations where the component determining the pipe or duct line's ending point is positioned at an indeterminate angle and position with regard to the pipe's/duct's direction of approach.
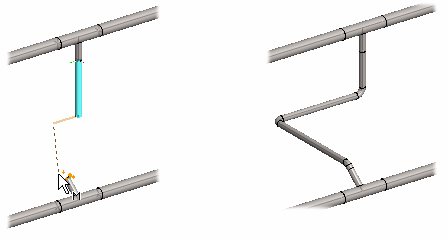
Route the pipe or duct line as follows.
- Do either of the following:
- Select Modeling |
 Pipe.
Pipe. - Select Modeling | Pipe

 Duct.
Duct.
- Select Modeling |
- If you want to continue a parallel line, select function Lock to handle
direction.

- Click the grip point of the pipe or duct component from which you wish to begin routing.
- Click the Automatic routing checkbox.

- Click the initial direction for the routing.
For example, click at least two points on the line. If necessary, click more points, depending on how far you wish to add the pipe/duct manually.
- Click one of the following as the end point for the routing.
- Click the grip point of a pipe/duct component.
- If you click the center line of a straight component, choose a component with which to connect the pipes to each other.
- If necessary, you can undo the route selected by the program by pressing Ctrl+Z.
 Note
Note
- You can use directional constraints to guide the automatic routing to start in a certain direction.
- The parts of the original pipe line are not moved by default. If necessary, you can select an auxiliary function that moves the parts in the Z direction or on the XY plane. This avoids unnecessary curves.
