
Route Pipe or Duct Line
Piping Design
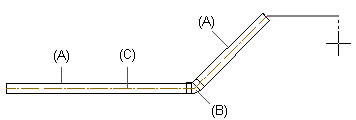
Add a pipe or duct line by drafting the line route. A line consists of a variety of component – for example, straight pipe (A) and elbow (B).
- Add a pipe or duct line by indicating the route of its center line (C) with points. This is easiest to do in the floor plan. You can also add a pipe or duct vertically in the floor plan by pressing the O key.
- You can begin routing from the grip point of a macro component (for example, bathroom fixture, HVAC fitting)
- Add the line without a slope, and add the slope afterwards.
- The direction of a line added in the vertical direction (Z axis) will be automatically fixed.
- An elbow piece is automatically added to locations where the route direction changes.
- The line parts are bound together with a grip point linkage.
- When adding a line, you can active the 3D model by pressing F2. You can hide objects in the model with the H key or limit the visibility of the model. Return to the drawing window by pressing the F2 key again.
- Pipe and duct lines of varying types are added on their own layers. For example, sewer pipes are added on layer 193. BY default, the layers shown in the floor plan vary on a customer-specific basis.
- You can also model a line by adding pipes or components from the component library.
- Add the line to approximately the correct location. Refine the pipe lengths and their relative positions using geometric constraints.