
Get Part Data from Item Database
General
- This instruction is related to the function Drawing | Mechanical | Parts List > Edit Element Attribute Database.
- With the help of the instruction described below, the material or item data is retrieved from the item database (d_COMPONENTS).
- If Vertex G4 is connected to the product data management system Vertex Flow, then the items are retrieved from Flow, and this instruction does not describe that method.
Get the Part Data from the Item Database
- Select Drawing | Mechanical |
 Parts List >
  Edit Element Attribute Database.
 - Click the part number.
- The program opens the dialog box Material Data.

- The program opens the dialog box Material Data.
- Select the
 preset button in the Label field.
- The program opens the dialog box Class Selection.
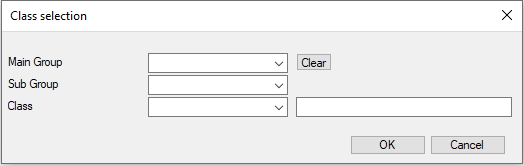
- The program opens the dialog box Class Selection.
- Select the preset button either in the Main Group, Sub Group or Class field.
- You can choose not to select a group or class, and click OK to list the contents of the entire item database.
- Please note: This can take a while if the item database contains thousands or tens of thousands of rows and choosing the right item from a large number is a lot of work.
- The program opens the dialog box Select Main Group.
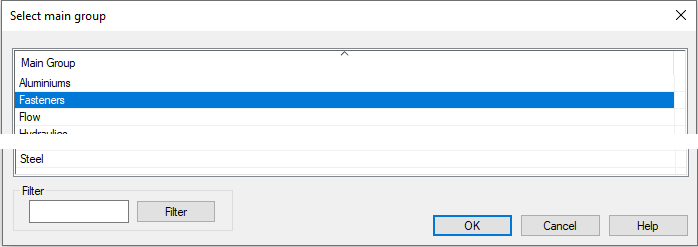
- You can choose not to select a group or class, and click OK to list the contents of the entire item database.
- Double-click on the row to select the main group or click the row and select OK.
- The program opens the dialog box Select Sub Group.
- You can choose not to select a sub group or class, and click OK to list all the items within the main group.
- Please note: Depending on the main group, there can be hundreds or thousands of items, so choosing the right item from a large group can be a lot of work.
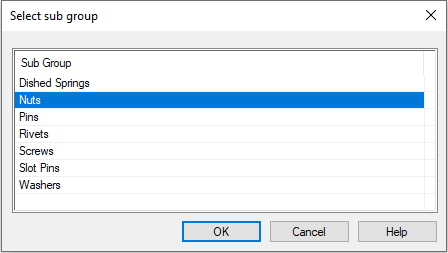
- Double-click on the row to select a sub group or click the row and select OK.
- The program opens the dialog box Select Class.
- You can choose not to select a class, and click OK to list all the items within the sub group.
- Please note: Depending on the sub group, there can be hundreds or thousands of items, so choosing the right item from a large group can be a lot of work.

- Double-click on the row to select a class or click the row and select OK.
- The program opens the dialog box Class Selection, where the search criteria for items have been completed.

- The program opens the dialog box Class Selection, where the search criteria for items have been completed.
- Click OK to accept the search criteria and start searching for the items.
- If necessary, clear all search criteria by selecting Clear and select new search criteria.
- The program lists items that have met the search criteria, if there are any in the item database.
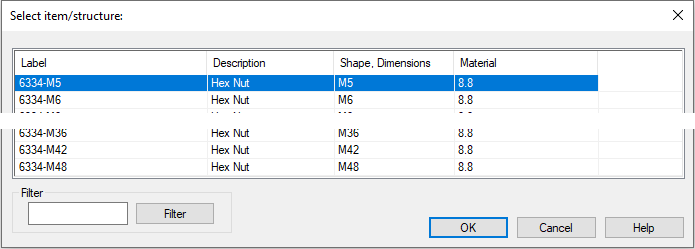
- Double-click on the row to select the item or click the row and select OK.
- The program retrieves the item data in the Material Data dialog box.
- If necessary, fill in the item data for the Amount and Qty fields.
- Click OK to accept and save the item data.
- Continue retrieving item data from the item database for part numbers by repeating steps 2...11.
- Quit adding part data.
- Select another function or
- press the Esc key.