
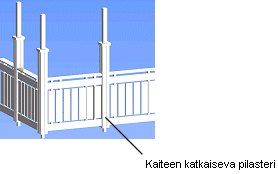
Railing Mid Post
Framer, Log House Design
You can add one or more posts in the middle of a railing.
- Select Modeling | Connection |
 Joint
Joint  Profiles
 Connection
Details. The browser is opened.
Connection
Details. The browser is opened. - Select the Railing Posts folder in the browser.
- Select the Railing Mid Post connection
- Select the post properties in the dialog box.
- Post Code. Accept the default post or click the Select Post button and select a post in the Macro Components database view.
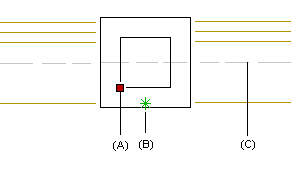
- Enter the displacement of the post's origin (A) from the point clicked as the post's
location (B) in the Post Displacement Parallel to Railing field
and the displacement of the post's origin (A) from the railing's baseline (C) in the
Post Displacement Perpendicular to Railing field.
- Select an angle from the Post Rotation from Railing Direction list.
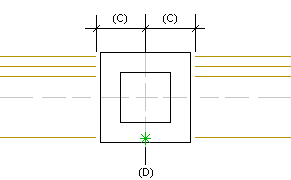
- Enter the railing end's distance (C) from the point clicked as the post's location (D)
in the Railing End Gap and Second Railing End
Gap fields.
- Select the railing.
- Click the locations for the posts. You can also click points outside the railing. The point you click will be projected perpendicularly onto the railing.
- Select Confirm.
 Note
Note
- Components of the type "21 Architectural Column" are collected to the Macro Components database view from the component library.
- The post will cut the railing's horizontal body only if the body has been defined as a sub part of a segment series in the railing's settings file. The settings files for each railing type are located in the ../custom/railing folder.