
Reflecting Geometry to Another Floor
With this function, you can reflect the 2D geometry of an object to another floor. For example, a chimney added on the first floor layout of a building runs through the upper floors in the 3D model of the building. You can reflect the 2D geometry of the chimney to the upper floors, after which it will be visible in the floor plan drawings, which are later created from the floors. You can reflect the geometry to one or more floors.
When you move or delete the original object, the reflected geometry is also moved or deleted. Equally, when you move the reflected geometry, the original object is also moved. When you delete the reflected geometry, the original object is not deleted.
 If you change the size of the
original object, for example stretch or shorten a wall, the size of the reflection does not
change. Equally, when you change the size of the reflection, the original object remains
unchanged.
If you change the size of the
original object, for example stretch or shorten a wall, the size of the reflection does not
change. Equally, when you change the size of the reflection, the original object remains
unchanged.
- Select Modeling |
 Tools
Tools 
 Reflect
Object.
Reflect
Object. - Select whether to draw the reflected geometry with the reflection color or with the true color:
 Use reflection
color - the function is selected in the auxiliary menu by default. When
the function is selected, the reflected geometry is drawn with the blue reflection
color.
Use reflection
color - the function is selected in the auxiliary menu by default. When
the function is selected, the reflected geometry is drawn with the blue reflection
color. Use reflection
color - If necessary, disable the function to draw the reflected geometry
with the true color of the building component.
Use reflection
color - If necessary, disable the function to draw the reflected geometry
with the true color of the building component.
- Select the object, the geometry of which will be reflected. You can select several objects with the Ctrl key pressed down, or by using the area selection.
- Select Confirm.
- Select the floor on which you want to reflect the geometry. Select several floors with the Ctrl key pressed down. You will be prompted: "Leave this drawing-model pair active?" The question refers to the drawing-model pair to which you are reflecting the geometry.
- Do either of the following:
- If you want to work in the drawing-model pair on which you are reflecting the geometry, select Yes.
- If you want to work in the drawing-model pair from where you selected the elements, select No.
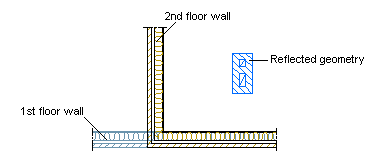
In the example, the active drawing is the second floor layout of the building. The walls of the first floor appear as a reference drawing. The reflected geometry of the first floor chimney is drawn with blue color.
 Note
Note
-
You can reflect following object types: walls, floors, ceilings, roofs, windows and doors, macro components, stairs, profiles, trusses. When you select the function, only these object types are available in the Selection Filter.
-
If the selected objects form a joint, for example two walls forming a corner joint, the joint is also copied when reflecting the geometry.
-
When reflecting a stair created with the Stair Generator on another floor, the arrow indicating the direction of the stairs points in the opposite direction from the original geometry if the Reflection is mirrored property has been selected for the stair.
-
When you change the type of a log wall, the change will also be refreshed in the log wall's reflected geometry. This concerns only log walls.
- You can delete the geometry reflection in following ways:
- Select the reflection in the basic mode of the program, and press the Delete key.
- Select the function Deleting Geometry Reflection.