
Collar Beam
Framer
Add the joint in the model window.
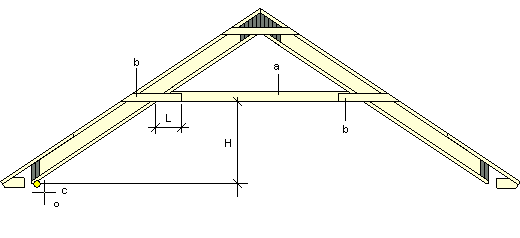
a = Collar beam
b = Fixing profile
c = Point determining the height
- Select Modeling | Panel |
 Floor >
  Framing Accessories. The browser is opened.
 - Select the Roof Accessories folder in the browser.
- Select Collar beam.
- Select the parameters in the dialog box:
- Collar beam height from clicked point (H) - The distance of the collar beam's bottom edge from the point you clicked (c).
- Code - Select a cross section for the collar beam (a) from the profile library by clicking the Select button.
- Library - The library containing the collar beam cross section.
- Fixing profile overlap at collar beam (L)
- Code - Select a cross section for the fixing profile (b) from the profile library by clicking the Select button. The fixing profiles are added on both sides of the beam.
- Library - The library containing the fixing profile cross section.
- Confirm by clicking OK.
- Select the rafters between which you wish to add the joint. Select the beams one by one or use area selection. You can select several pairs of beams at once.
- Select Confirm.
- Define the height of the bottom edge. Click the point in the model (c). If you selected a value for the parameter Collar beam height from the clicked point, the bottom edge will be positioned at the distance determined by the parameter from the point you clicked.

Note:
- The program will automatically create a rafter structure of the joint components, allowing you to use floor and roof panel design functions on it. You can, for example, generate a panel drawing of the joint components, or delete both the panel information and the joint components.