
Start a New Building
When you start a design process, create a new building.
- Do one of the following:
- Select
 >
>  New Building.
 - Select Archives | Buildings | New.
- Press Ctrl+N.
The New Building dialog box opens.
- Select
- Define the properties of the building in the dialog box.
When using a local archive, the program will create a new folder in the selected saving location with the same name as the building id. Folders, databases and files associated with the selected template building are saved in the folder. Below is an example of the building’s folder structure.

- Fill in the project information in the building’s data card. Only the initial information is typed in the data card at this point, and updated as the design work proceeds. The information is saved in the archive, which is managed with the archive database PROREG. You can use the information as search criteria when you are searching for documents from the document archive of buildings. You can later edit the building data by selecting the Archives | Buildings |
 Edit Data function.
- Select the active drawing-model pair. The program will create drawing-model pairs for the building based on the selected template building. Select the drawing-model pair from a button menu, for example:
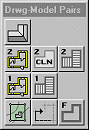
- Roof
- 2nd floor plan drawing
- 2nd level, deck layout
- 1st floor plan drawing
- 1st floor deck
- Terrain
- Foundations
Alternatively, you can define a drawing-model pair to be automatically activated without a need for separate selection, see Automatically Activated Drawing-model Pair.
The building will be activated. The drawing file of the drawing-model pair is opened in the drawing window and the model file in the model window. You can change the active working window by clicking the button in the top left corner of the working window

or by pressing the F2 key.