
Pattern Associative to an Assembly Pattern
You can use this function to create a linear or circular pattern by selecting a part from a pattern in an assembly. The selected pattern determines the shape of the new pattern. For instance, if the part belongs to a circular pattern, the new pattern will also be circular.
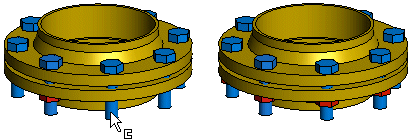
In the image, a nut is added to a screw pattern.
- Select the component from which you wish to create a pattern from the assembly.
- Select the Pattern function from the context-sensitive menu.
- Leave the fields empty in the assembly pattern dialog box.
- Select positioning the pattern by clicking Part from Pattern.
- Click a part in the pattern.
- The pattern properties are displayed in a dialog box. You cannot edit the data. You can select a different positioning method.
- Click OK.
Note:
- If you wish to edit a pattern associated with the pattern, only edit the data of one of the patterns. Both patterns will be updated.
- You can delete individual components from the pattern associated with the part pattern. Select one or more components from the pattern and then select the context-sensitive function Delete.
- Deleted parts are unique to a pattern, but if you delete a part from the reference pattern, all the patterns associative to it will be edited to reflect the change. Which means that any individual deletions in the reference patterns will be lost.