
Create a Polar Pattern by Defining the Number of Elements
Create a polar pattern in a circumferential shape or both circumferentially and lengthways.
- Select the component from which you wish to create a pattern from the assembly.
- Select the Pattern function from the context-sensitive menu.
- Select Polar in the dialog box of the pattern in the assembly.
- Do either of the following:
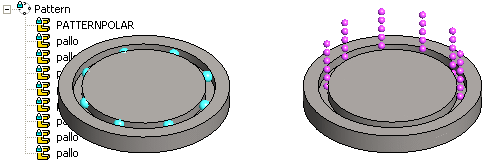
- Define the pattern circumferentially. Complement the data in the Circle section. Fill in the Number and Radius of the components. The number includes the component used to create the pattern.
- If you are adding the pattern both circumferentially and lengthways, you need to complement the data in both the Circle and Length Direction sections. Fill in the Number and Delta for the lengthways direction.
- Select positioning the pattern by clicking New Pattern.
- Click OK.
- Click the position of the center point of the circular control part in the assembly.
Note:
- You can edit the properties of a polar pattern by selecting the pattern from the assembly tree and then selecting the Edit function.
- If you position the pattern using the New Pattern selection, the software will add the
 PATTERNPOLAR control part to the pattern. After adding the pattern you can edit the direction and relative positions of the components in the 3D sketch of the control part.
 - You can set visible the control part of a polar pattern in the model drawing. Select as a property of a control part
 Reference geometry visible.