
Shell
- On the
 tab, in the Tools group, select
  Shell.
 - Select the single or several surface.
The shell dialog box is opened.
- Define the shell properties.
- Click OK.
In Context-sensitive Menu
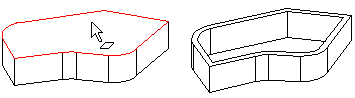
You can shell the volume. Select one or more faces to be penetrated, and enter the wall thickness. The thickness will be the same for all walls. You can select the shelling after having selected the faces to be penetrated on the volume. Define the wall thickness value in the dialog box.
For shelling, two faces have been selected on the volume to be penetrated: the bottom and top face. The shelling will be made through the faces. The wall is added to the outside.
Create a shell as follows:
- Select one or more faces to be penetrated.
- Select the context-sensitive function
 Shell.
 - Define the shell properties.
- Preview by clicking the Apply button in the dialog box. If necessary, you can still edit the feature data.
- Click OK.

Note:
- Edit the data of a feature by first selecting the face formed by the feature, then selecting the context-sensitive function Edit Operation.
Example: Wall on the inside/outside
The faces to be penetrated have been selected for shelling. The wall can be added to the inside of the part (A). The wall can be added outside (B).
