Feature Pattern
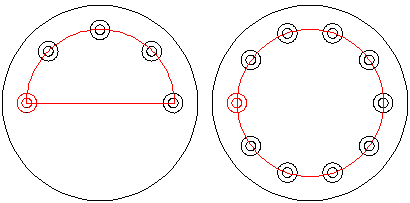
You can create a feature pattern by copying a parent feature linearly in the longitudinal and/or latitudinal direction, or circularly. The features copied to the feature pattern will be associated with the parent feature. When you edit the properties of the parent feature, the changes will be reflected in the copied features. You cannot edit a copied feature directly.

The parent feature can be a feature based on a sketch, a sweep, a loft, or a library feature. The parent feature can contain more than one feature, for example a hole with a rounded edge. If you want to create a feature pattern from a rounding or a bevel, you must also include in the pattern creation the feature to the geometry of which the rounding has been added.

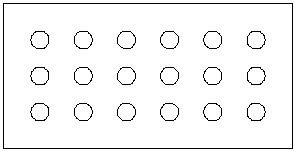
The parent feature is counted as one of the features in a linear and circular feature pattern. If you wish to use a parent feature to create a linear 3 x 3 feature pattern with three features in both the longitudinal and latitudinal direction, the feature pattern will include the parent feature and eight copies of it.
Selecting a Feature for a Feature Pattern
The feature pattern is created from a parent feature that can be a feature based on a sketch, a sweep, a loft, or a library feature. A parent feature can contain more than one feature. If you want to create a feature pattern from a rounding or a bevel, you must also include in the pattern creation the feature to whose geometry the rounding/bevel has been added.
You can create a feature group by selecting one or more features from the model of a face, and then selecting the Feature Pattern function from the context-sensitive menu. Alternatively, you can select one or more (by pressing Ctrl+Left mouse button) Boss/Cutout features from the feature tree of the part and then the Feature Pattern function.
Defining Feature Pattern Properties
A linear feature pattern can be defined in the longitudinal or latitudinal direction or in both directions. In the feature pattern properties, you define, for example, the number of features and the distance between them. The longitudinal direction (A) is the direction of the x axis and the latitudinal direction (B) the direction of the y axis. The feature pattern angle in the longitudinal and latitudinal direction is 90 degrees (default). The angle can also be changed (C).

A circular feature pattern can be an entire circle or a part of it. In the feature pattern properties, you define the number of features and the angle between them.

A circular feature pattern can be defined for a cylinder face. If necessary, it can also be defined in several layers.

Positioning a Feature Pattern Sketch
After defining the feature pattern properties, you can add the feature pattern sketch to a part in the sketching mode. The lines on the sketch depict the dimensions and direction of the feature pattern. The sketch shows the feature pattern properties as angle and distance dimensions. The origin of the sketch is used as the insertion point for positioning the sketch to a point (A) or line on the parent feature. The program will automatically add the coincident constraint for the origin of the sketch and the element selected from the parent feature. You can add more constraints to the sketch, for example, make it parallel with the edge of the face (B).

After accepting the sketch, the feature pattern will be inserted in the part.

Editing a Feature Pattern
You can edit a feature pattern in the following ways:
- edit the parent feature properties.

- edit the feature pattern properties, for example, change the angle

- edit the geometric constraints in the feature pattern sketch, for example, change dimension constraints.
Deleting a Feature Pattern
You can delete a feature pattern in the following ways:
- select features to be deleted from the feature pattern
- delete the feature pattern but leave the parent feature on the part
- delete the feature pattern and parent feature
