
Create a New Assembly to the Archives
General
- All new assemblies should be started by giving them a label, i.e. an archive name.
- You can start a new assembly without entering a label to the part, but the assembly must be stored in the archive in order to find it through the archive and to add it to another assembly.
- You can start a new part or a new assembly also in an existing assembly, in which case the new part/assembly becomes a part of the main assembly.
Create a New Assembly Visible in the Archive
- Select File >
 New or
- press Ctrl and N keys at the same time.
- The program opens the dialog box New Document.

- Select Assembly
- Define the assembly data in the New Document dialog box.
- For more details, see New Document Dialog Box
- Enter the name of the assembly in the Label field or select Get.
- Select
 To Project when creating a document for a specific project.
 - Open an existing project by clicking the Select button, or create a new project by clicking the New button.
- Fill in the archive data of the assembly by clicking Archive Data.
- If you want to add the model to an item, click Item Data. Fill in the data in the Item Data dialog box.
- If you want to add a new assembly as a file, clear the selection
 To project, and select
  Add to file. Select the file's location by clicking Browse.
- Select OK.
- The program opens an empty assembly modeling window.
Create a New Link Assembly to an Existing Assembly
- Activate the assembly window if it is not already active.
- Select the context-sensitive function
 New.
New. - Continue as above from step 2.
- Accept the selection Add to archive.
- By default, the new assembly is saved to the same project where the main assembly is.
- Accept the selection
Example: The label of the new assembly is LinkAssy
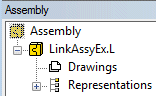
- The main assembly and its parts are shown in the feature tree with a dim color.
- A dot followed by the letter L after the label indicates a link assembly.
Create a New Local Assembly to an Existing Assembly
- Activate the assembly window if it is not already active.
- Select the context-sensitive function New.
- Select Assembly.
- Enter the name of the assembly in the Label field.
- Select Local.
- Select OK.
Example: The label of the new assembly is LocalAssy
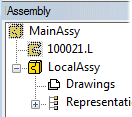
- The main assembly and its parts are shown in the feature tree with a dim color.
- Local assembly is not followed by a suffix.