
End a Pipe Line
Piping Design
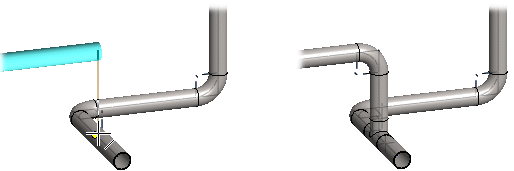
As an example, ending a pipe line
A pipeline can end at the following:
- The end of the pipe
- A pipe component
- A branch component
- A set-on
- See also Automatic Routing.
Ending at the End of the Pipe

With adding a pipe line selected, do as follows:
- Select either of the following:
- Continuous pipe. End the pipe line as a continuous.

- Jointed pipe. End the pipe line as a jointed.The Structure of an Excel Template Report
- Continuous pipe. End the pipe line as a continuous.
- Move the cursor near the handle of the pipe. The cursor snaps to the grip point. Select the grip point.
- Click a point.
Ending with a Pipe Component
In some cases, you cannot end the pipeline until you have added the counterpart component.
Ending with a pipe component can be done if the pipeline is perpendicular to the component.

With adding a pipe line selected, do as follows:
- Move the cursor near the end point of the pipe's centerline. The cursor snaps to the grip point.
- Click a point.
Ending with a Branch Component
With adding a pipe line selected, do as follows:
- Move the cursor near the pipe's centerline. The cursor snaps to the center line.
- Click a point on the pipe's center line.
- Select T-branch from the library.
 Browser - Archives
 - Select Confirm.
Ending with a Set-on

With adding a pipe line selected, do as follows:
- Select a function.

- Move the cursor over the pipe.
- Click a point on the pipe's center line.
Note:
- You can also set the component on using the Alt key. With adding a pipe line selected, do as follows:
- Press the Alt key.
- Move the cursor over the pipe.
- Click a point on the pipe's center line.
- Release the Alt key.