
Add a Non-rectangular Cross Section
First, draw the cross section.
- Select
 >
>  New.
New. - Select Drawing as the document type, and enter a name for the drawing in the Label field. The file is saved in the project folder by default. If you clear To project, the file is saved to the ../shared/picts folder by default. The saving location is not significant here as you will later move the file to the profile library’s folder.
- Draw the cross section so that its center point is located at the drawing origin. The edge line of the cross section must be a continuous closed line.
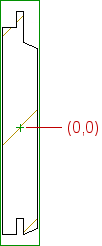
- Add a hatch inside the closed line.
- Save the drawing file.

Add a new cross section to the profile library.
- Select System | Libraries |
 Profile >
  Edit Cross Sections.
 - Select a library. The changes are saved in the ../custom/proflibrary/library_name folder.
- Select
 Cross Section Library.
 - Add a new row to the database or copy an existing row.
- Fill in the data of the new cross section. Please note, that the file name in the Cross Section Accurate and Cross Section Coarse is the same as the name of the drawing file you saved. Confirm by clicking OK.
- Copy the file you drew from the ../shared/picts folder to the ../custom/proflibrary/library_name folder.
Note: System tab is only available if you are a system administrator.