
Add a Primary Beam
Framer, Floor Framing & Rafters
This function can be used to add a primary beam to the framing. The vertical position of the beam is determined by that of the framing. The beam is a separate profile that is not attached to the framing. The beam is only attached to the framing when you add it to the edge of the framing in such a way that the beam is inside the framing (not under it).
Select the cross section and add the primary beam as you would a normal beam, see Add a Beam. However, the parameters of a beam added under the framing are different from one added as a profile. You do not type a vertical position for a beam added under the framing, but its position is tied to the top or bottom surface of the framing.
- Select the structure. The basic layer of the structure will be automatically selected. If necessary, you can select another layer which defines the height of the beam.
- Select Plane Structure | Framing |
 Add Profile
 Add Primary
Beam.
Add Primary
Beam. - Select the beam properties.
- Select one of the following from the Location list in the dialog box:
- Dropped
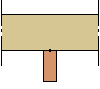
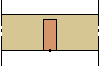
- Flushed Bottom
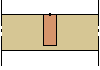
- Flushed Top
- Dropped
- If you are adding the primary beam to roof framing and the direction of the beam is
aligned with the ridge of the roof, select one of the following from the
Position list in the dialog box:
- Vertical

- Perpendicularly to the Roof Plane

- Vertical
- Select one of the following as the locating point for the cross section:
 Beam Right
Side
Beam Right
Side Beam
Middle
Beam
Middle Beam Left
Side
Beam Left
Side
- Select the start point of the beam.
- Select the end point of the beam.
