
Smart Line Chain
General
- With the function, you can draw a chain of lines where the lines and arcs follow each other tangentially, or the line or arc continues at a 90° angle to the previous line.
- If you click the end point of the line as the starting point, the line starts either perpendicularly or tangentially as a straight line or an arc.
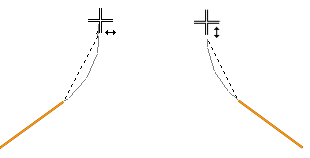
- The program shows the current direction or locking with cursor symbols.
- You can change the starting direction of the line (tangential or perpendicular) by moving the cursor near the starting point of the line. This releases the direction of the cursor.
- The smart line chain is available in both drawings and plane sketches of part models.
Direction locking symbols
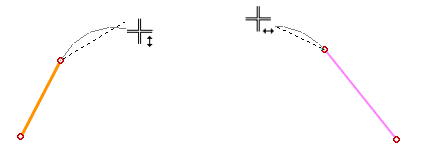
 Drawing of an arc ends with the next line drawn vertically/horizontally.
 Drawing of an arc ends with the next line drawn horizontally/vertically.
 Drawing of an arc ends with the next line drawn perpendicular to the line preceding the arc.
 After the arc, a line tangential to the arc is drawn.
 A line is drawn perpendicular to another line.
- When an arc is drawn in such a way that it forms a semicircle, that is, the drawing of the arc ends when it is in a perpendicular line to its starting point.
- When an arc or line starts from the end of the arc perpendicular to its tangential extension.
 The endpoint of a line is drawn symmetrically with respect to the center cross of the sketch.
- Symmetry is not used in a drawing.
- The normal horizontal, vertical and 45° orientation symbols (X, Y and 45) are also visible when the first line of the smart line chain is drawn.
Draw a line chain
- Select Drafting | Lines |
 Line >
  Smart.
 - Click the start point of the line. You can also click the start point from the end point of the drawn line or arc.
- Click the end point of the line.
- Drawing a smart line chain from scratch always starts with a line (segment).
- The program suggests drawing a tangential arc for the line.
- Move the cursor so that the symbol of the desired lock appears in the lower right corner of the cursor to use the locks and click the cursor.
If you do not want to use locks, click the next point so that no lock symbols are displayed on the cursor.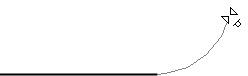
- Click the endpoint of the next line or arc.
- Repeat steps 4 and 5 to continue drawing a smart line chain.
- Select Confirm.
- Repeat steps 2 to 7 to continue drawing the next line chain.
- Quit by pressing the Esc key.
Examples
- The line following the arc being drawn is drawn in an upright position.
- The line following the arc being drawn is drawn in a horizontal position.
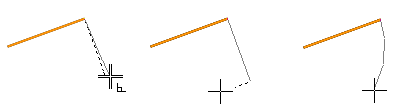
- The line or arc to be drawn is drawn perpendicular to the previous line.
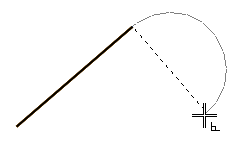
- The arc to be drawn is drawn in the shape of a semicircle so that the line following the arc can be drawn parallel to or perpendicular to the previous line (segment).
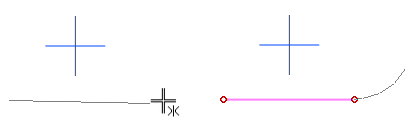
- The line is drawn (only in a sketch ) symmetric to the center cross.